
Homemade Magic: Copycat Little Debbie Valentine Cakes Recipe
Crafting homemade little debbie valentine cakes brings nostalgic joy to weekend baking adventures.
Sweet memories flood back with each delightful bite of these classic treats.
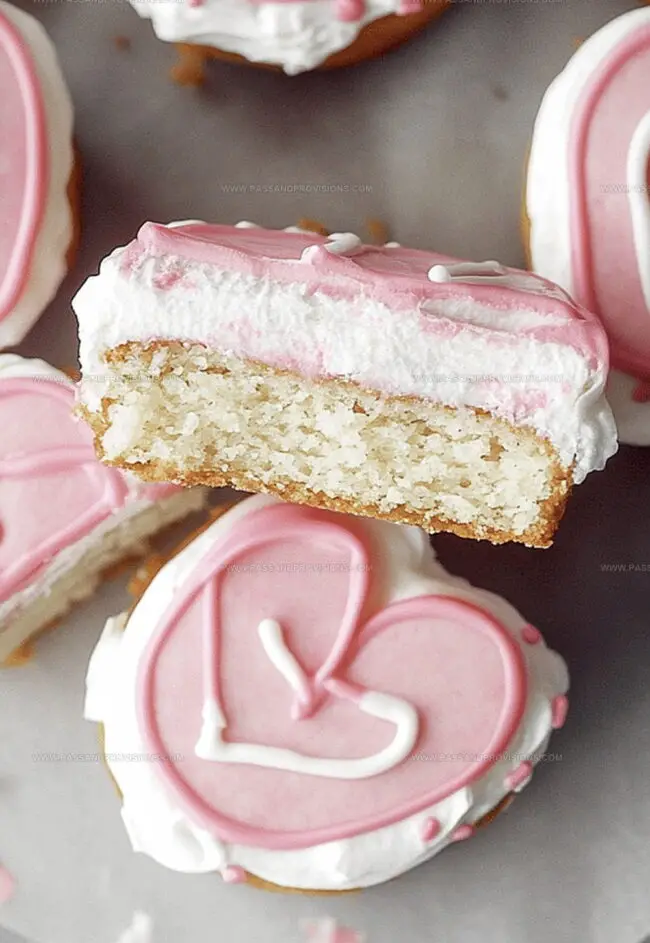
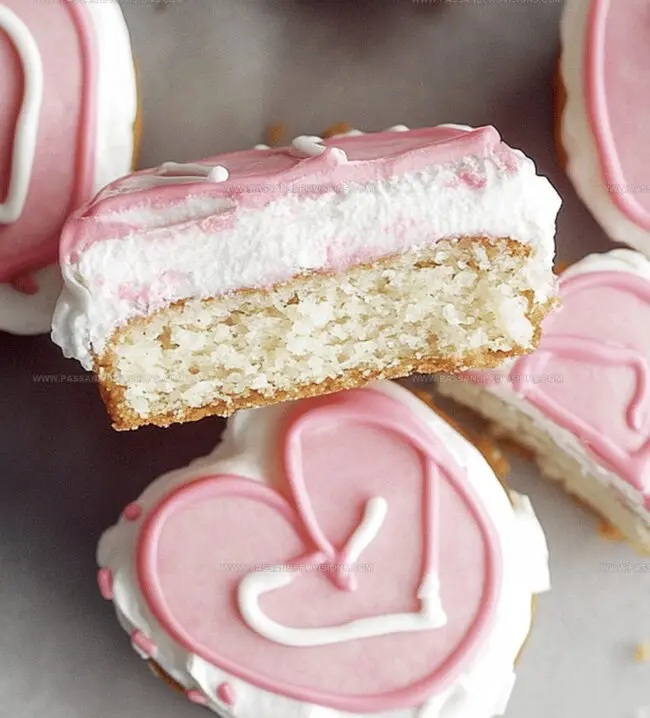
Soft pink frosting and heart-shaped design capture childhood excitement perfectly.
Chocolate cake layers melt effortlessly on your tongue, creating magical moments.
Recreating this beloved snack cake feels like unlocking a secret family recipe.
Playful and simple ingredients make these cakes accessible for bakers of all skill levels.
You’ll fall in love with this delectable copycat that beats store-bought versions hands down.
Why Copycat Little Debbie Valentine Cakes Are Worth It
What’s in These Sweetheart Snacks
Cake Base Ingredients:Leavening and Seasoning Ingredients:Flavor and Color Ingredients:Instructions for Making Valentine Cakes at Home
Step 1: Prepare Baking Station
Warm up the oven to 350F. Grab a 9×13-inch pan and line it with parchment paper. Lightly coat the paper with cooking spray to prevent sticking.
Step 2: Mix Dry Ingredients
Grab a medium bowl and combine:Whisk these ingredients until perfectly blended.
Step 3: Create Creamy Base
In a large mixing bowl, beat butter and sugar until the mixture looks fluffy and light. Add eggs one by one, mixing thoroughly after each. Pour in vanilla extract and blend smoothly.
Step 4: Combine Wet and Dry Mixtures
Slowly add dry ingredients and buttermilk to the creamy mixture. Start and end with dry ingredients. Drop in red gel food coloring to create a gorgeous pink shade.
Step 5: Bake the Cake
Pour batter into the prepared pan, spreading it evenly. Slide the pan into the preheated oven. Bake for 18-20 minutes until a toothpick comes out clean when inserted in the center. Allow the cake to cool completely.
Step 6: Create Valentine Decoration
Once cooled, slice the cake into heart shapes. Prepare a sweet frosting to decorate and make them look just like Little Debbie’s famous Valentine cakes.
Helpful Tips for Taste and Texture
How to Store and Reheat These Cakes
Treats and Drinks That Go Well with Them
Variations for Any Holiday or Mood
Answers to Valentine Cake Questions
A few drops of red gel food coloring are added to the batter to create the vibrant pink hue, mimicking the classic Little Debbie Valentine cake appearance.
Gel food coloring is recommended because it provides a more intense color without adding extra liquid to the batter. Regular liquid food coloring might alter the cake’s texture and consistency.
Insert a toothpick into the center of the cake. If it comes out clean with no raw batter, the cake is done. The baking time is typically 18-20 minutes at 350°F.
Buttermilk helps create a tender, moist cake by adding acidity that breaks down gluten, resulting in a softer texture and enhancing the cake’s overall flavor.
Print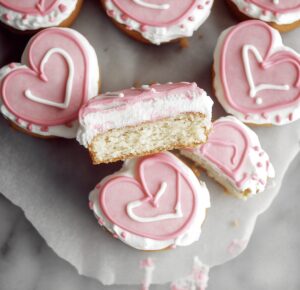
Copycat Little Debbie Valentine Cakes Recipe
- Total Time: 50 minutes
- Yield: 12 1x
Description
Little Debbie Valentine Cakes bring nostalgic sweetness to homemade desserts, recreating childhood memories with layers of love. Chocolate cake, creamy filling, and festive decorations make these treats perfect for sharing special moments with family and friends.
Ingredients
Main Ingredients:
- 1 ¼ cups (156 grams) all-purpose flour
- 2 large eggs
- ½ cup (113 grams) unsalted butter, softened
- ¾ cup (150 grams) granulated sugar
- ½ cup (120 milliliters) buttermilk
Leavening Agents:
- 1 teaspoon baking powder
- ¼ teaspoon baking soda
- ¼ teaspoon salt
Flavoring and Decorative Ingredients:
- 1 teaspoon vanilla extract
- Red gel food coloring
- ½ cup (113 grams) unsalted butter, softened
- 1 ½ cups (180 grams) powdered sugar
- 1 teaspoon vanilla extract
- 2 tablespoons (30 milliliters) heavy cream
- 12 ounces (340 grams) white chocolate or white candy melts
- 2 ounces (57 grams) pink or red candy melts (for decoration)
Instructions
- Prepare the oven environment by heating to 350F (175C) and preparing a 9×13-inch pan with parchment paper and a light grease coating.
- Combine flour, baking powder, baking soda, and salt in a medium mixing vessel, creating a unified dry ingredient blend.
- Transform butter and sugar into a pillowy, aerated mixture using a creaming technique. Incorporate eggs individually, ensuring thorough integration after each addition. Infuse the mixture with vanilla extract’s aromatic essence.
- Create a harmonious batter by alternating between dry ingredient mixture and buttermilk, initiating and concluding with dry components. Enhance the visual appeal by introducing red gel food coloring, transforming the batter into a vibrant pink palette.
- Transfer the meticulously prepared batter into the awaiting pan, ensuring an even distribution across the surface.
- Allow the cake to bake for 18-20 minutes, monitoring for a perfectly cooked interior by testing with a toothpick that emerges clean when inserted.
- Remove from the oven and permit the cake to cool completely, preparing it for subsequent decoration and transformation.
Notes
- Tweak the color palette by experimenting with different food gel colors to match seasonal themes or personal preferences.
- Ensure buttermilk is at room temperature for smoother ingredient incorporation and consistent cake texture.
- Create gluten-free version by substituting all-purpose flour with a 1:1 gluten-free baking blend, maintaining the same measurement proportions.
- When adding food coloring, start with minimal drops and gradually increase to achieve desired shade without affecting the cake’s flavor or texture.
- Prep Time: 20 minutes
- Cook Time: 30 minutes
- Category: Desserts, Snacks
- Method: Baking
- Cuisine: American
Nutrition
- Serving Size: 12
- Calories: 315
- Sugar: 28 g
- Sodium: 150 mg
- Fat: 17 g
- Saturated Fat: 10 g
- Unsaturated Fat: 7 g
- Trans Fat: 0 g
- Carbohydrates: 39 g
- Fiber: 0 g
- Protein: 3 g
- Cholesterol: 50 mg
Jamie Granger
Recipe Developer & Food Writer
Expertise
Education
Culinary Institute of America
Jamie Granger turns ingredients into memories. With her recipes, she brings a fusion-forward flair to every creation.
Her dishes reflect the places she’s explored, the chefs she’s learned from, and the deep connection she has to food as a form of expression.
At Pass and Provision, Jamie develops recipes that balance flavor, health, and beauty, meals that don’t just satisfy your appetite but speak to your curiosity.