
Romantic Red Velvet Whoopie Pies Recipe for Valentine’s Day
Sweet moments spark when rich valentines red velvet whoopie pies arrive at your dessert table, promising romantic indulgence.
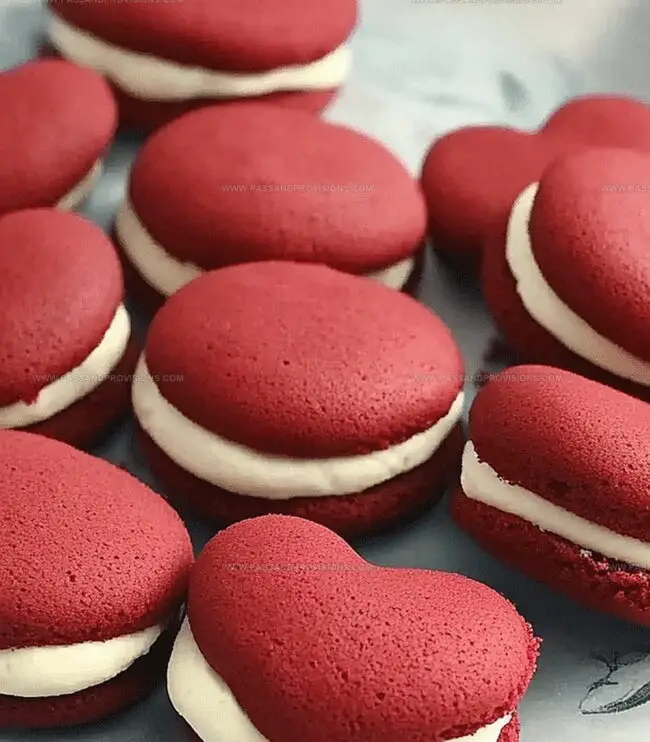
Soft crimson cake rounds sandwich delicate cream cheese filling, creating miniature love letters.
Heart-shaped platters showcase these charming confections that melt faster than chocolate in warm hands.
Delicate swirls of frosting peek from between pillowy cake layers, whispering sweet nothings.
Unexpected textures and vibrant colors make these treats perfect for celebrating intimate connections.
Passionate bakers understand how simple ingredients can craft magical experiences worth sharing.
Prepare to impress your special someone with these adorable, irresistible delights that speak volumes without uttering a single word.
Why Whoopie Pies Bring Joy to the Table

What You’ll Need for Red Velvet Whoopies
Base Ingredients:Dry Ingredients:Liquid Ingredients:Filling Ingredients:Decoration Ingredients:How to Make These Soft Sandwich Treats
Step 1: Prepare Baking Equipment
Preheat oven to 350F (175C). Line baking sheets with parchment paper or silicone mats.
Step 2: Create Cookie Base
In a large mixing bowl, cream together:Until light and fluffy. Add:Mix until well combined.
Step 3: Combine Dry Ingredients
In a separate bowl, whisk together:Step 4: Mix Batter
Gradually add dry ingredients to wet mixture in three additions, alternating with buttermilk. Start and end with dry ingredients. Mix until just combined.
Step 5: Shape Cookies
Use a small cookie scoop to drop batter mounds onto prepared baking sheets, spacing 2 inches apart.
Step 6: Bake Cookies
Bake for 8-10 minutes until cookies are set and spring back when touched. Cool on baking sheet for 5 minutes, then transfer to wire rack.
Step 7: Whip Cream Cheese Filling
In a medium bowl, beat until smooth:Gradually add powdered sugar and beat until fluffy.
Step 8: Construct Whoopie Pies
Spread cream cheese filling on flat side of half the cookies. Top with remaining cookies, pressing gently.
Step 9: Add Festive Touches
Roll edges in sprinkles or press heart-shaped candies onto filling.
Step 10: Serve and Enjoy
Serve immediately or refrigerate until ready to eat.
Tips to Get Even Rounds and Fluffy Filling
Store Whoopies to Keep Them Fresh and Tasty
Great Sips to Serve With These Pies
Whoopie Pie Twists for Variety
Red Velvet Whoopie FAQs
Red velvet whoopie pies are soft, cake-like sandwich cookies with a distinctive red color and mild cocoa flavor. Unlike traditional cookies, they have a more pillowy texture that’s closer to mini cakes.
Yes, you can omit the red food coloring. The cookies will look more like chocolate whoopie pies but will still taste delicious. If you want a natural red color, try using beetroot powder as an alternative.
Use a cookie scoop for uniform sizes and consistent shapes. When scooping the batter, keep the mounds round and evenly spaced on the baking sheet. Gently tap the baking sheet to help the batter spread evenly.
Buttermilk helps create a tender, moist texture and adds slight tanginess. If you don’t have buttermilk, you can make a quick substitute by adding 1 tablespoon of white vinegar or lemon juice to 1 cup of milk and letting it sit for 5 minutes.
Print
Valentines Red Velvet Whoopie Pies Recipe
- Total Time: 30 minutes
- Yield: 12 1x
Description
Sweet passion meets classic romance in these red velvet whoopie pies, perfectly crafted for love’s special moment. Creamy cream cheese filling nestled between two pillowy chocolate-kissed cakes promises pure Valentine’s Day bliss that will make hearts flutter.
Ingredients
Main Ingredients:
- 1 large egg
- ½ cup unsalted butter, softened (for cookies)
- 1 cup granulated sugar
- 1 ¾ cups all-purpose flour
- ½ cup buttermilk
Baking and Flavoring Ingredients:
- ¼ cup unsweetened cocoa powder
- 1 tablespoon red food coloring
- ½ teaspoon baking soda
- ¼ teaspoon salt
- 1 teaspoon vanilla extract
Filling and Decoration Ingredients:
- 4 ounces (113 grams) cream cheese, softened
- ¼ cup unsalted butter, softened
- 1 ½ cups powdered sugar
- 1 teaspoon vanilla extract
- Valentines sprinkles
- Mini heart-shaped candies
Instructions
- Warm the oven to 350F and prepare baking sheets with parchment paper or silicone mats for optimal cookie performance.
- Create a smooth butter and sugar base using an electric mixer until the mixture becomes pale and airy.
- Incorporate the egg, vanilla extract, and vibrant red food coloring, blending thoroughly to ensure even color distribution.
- Separately combine flour, cocoa powder, baking soda, and salt, creating a uniform dry ingredient mixture.
- Gradually fold the dry ingredients into the wet mixture, alternating with buttermilk, mixing until just incorporated to maintain a tender texture.
- Portion the batter using a cookie scoop onto prepared sheets, ensuring consistent spacing to allow proper spreading during baking.
- Bake for 8-10 minutes, watching for subtle signs of doneness like slight springiness and set edges.
- Allow cookies to rest on the baking sheet briefly before transferring to a cooling rack for complete temperature reduction.
- Whip cream cheese, butter, and vanilla extract until silky smooth, creating a luxurious filling base.
- Slowly integrate powdered sugar, beating until the filling becomes light and fluffy with a creamy consistency.
- Generously spread cream cheese filling onto one cookie surface, ensuring complete coverage.
- Delicately sandwich cookies together, applying gentle pressure to secure the filling.
- Embellish edges with festive sprinkles or press heart-shaped candies into the filling for a romantic Valentine’s presentation.
- Serve immediately or refrigerate to maintain structural integrity and flavor.
Notes
- Choose high-quality cocoa powder for a rich, deep chocolate flavor that elevates the red velvet taste.
- Avoid overmixing the batter to prevent tough, dense whoopie pies; mix just until ingredients are combined.
- Ensure ingredients like buttermilk and cream cheese are at room temperature for smoother, more even mixing.
- Use gel food coloring for a more vibrant red color without thinning the batter, creating picture-perfect Valentine’s treats.
- Prep Time: 10 minutes
- Cook Time: 20 minutes
- Category: Desserts, Snacks
- Method: Baking
- Cuisine: American
Nutrition
- Serving Size: 12
- Calories: 240
- Sugar: 19 g
- Sodium: 200 mg
- Fat: 10 g
- Saturated Fat: 6 g
- Unsaturated Fat: 4 g
- Trans Fat: 0 g
- Carbohydrates: 35 g
- Fiber: 1 g
- Protein: 2 g
- Cholesterol: 30 mg
Jamie Granger
Recipe Developer & Food Writer
Expertise
Education
Culinary Institute of America
Jamie Granger turns ingredients into memories. With her recipes, she brings a fusion-forward flair to every creation.
Her dishes reflect the places she’s explored, the chefs she’s learned from, and the deep connection she has to food as a form of expression.
At Pass and Provision, Jamie develops recipes that balance flavor, health, and beauty, meals that don’t just satisfy your appetite but speak to your curiosity.