Coziest Hot Chocolate Cookie Cups Recipe for Winter Magic
Cozy winter nights spark an irresistible craving for hot chocolate cookie cups that melt hearts instantly.
Sweet memories of childhood comfort drift through kitchens filled with warm aromas.
Chocolate lovers recognize these delightful treats as more than just desserts – they’re edible hugs.
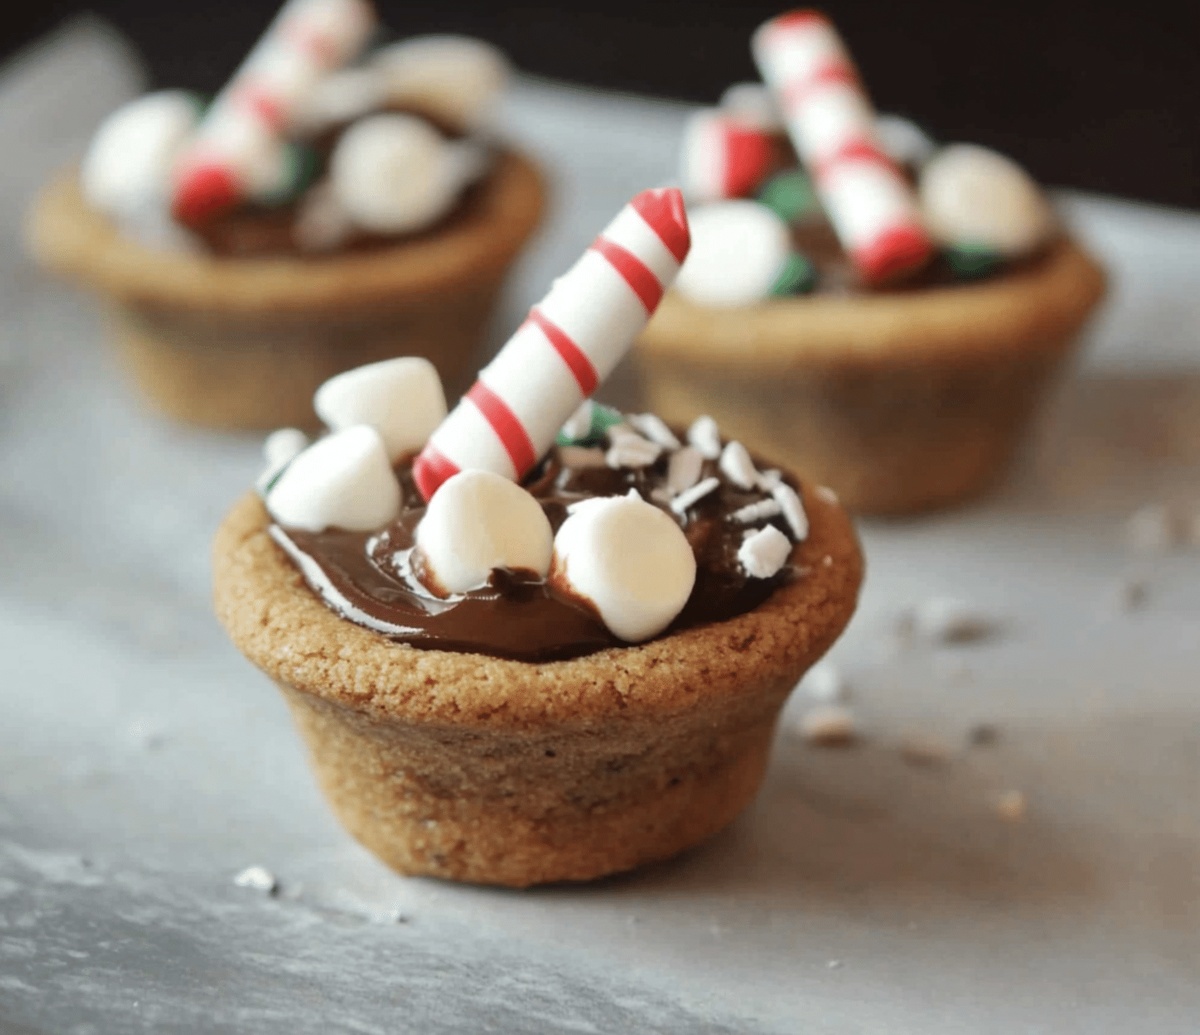
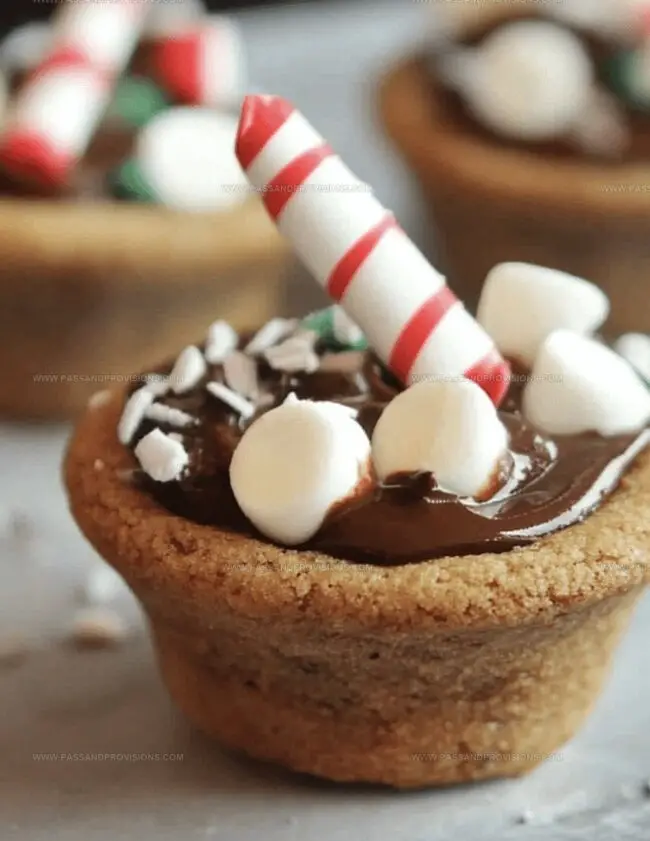
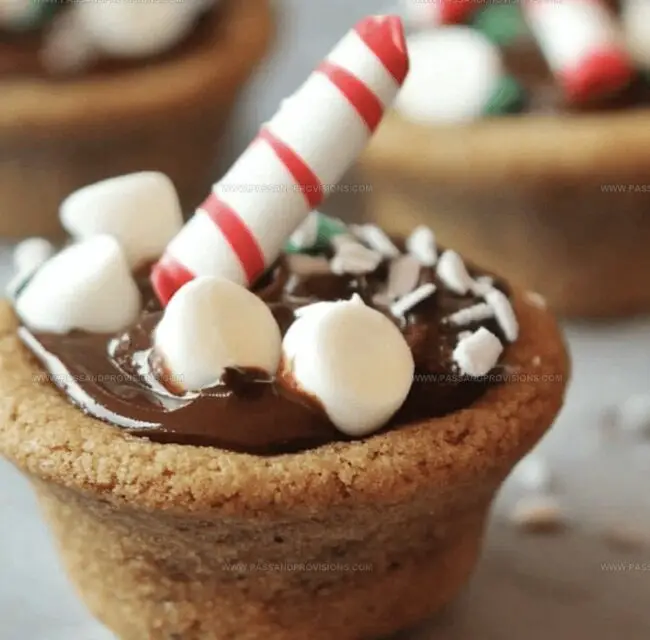
Delicate cookie shells cradle rich chocolate goodness in every adorable bite.
Crisp edges give way to soft, gooey centers that promise pure indulgence.
Marshmallow-topped miniature delights invite you to experience pure magic in a single serving.
One taste will transport you to a world of delectable happiness.
Prepare to fall in love with this irresistible cookie experience that begs to be shared.
Why Hot Chocolate Cookie Cups Are a Cozy Hit
Ingredients to Make Cookie Cups with Cocoa
Base Ingredients:Sweetening Ingredients:Binding and Moisture Ingredients:Filling and Topping Ingredients:Step-by-Step Guide to Cookie Cups with Cocoa
Step 1: Prepare the Oven
Preheat the oven to 350°F (175°C). Grab a mini muffin tin and give it a light coating of cooking spray or butter.
Step 2: Create Cookie Dough
Grab two mixing bowls. In the first bowl, whisk together:In a second bowl, cream together:Beat in eggs and vanilla. Slowly incorporate the dry ingredients until a smooth dough forms.
Step 3: Shape Cookie Vessels
Roll small balls of dough and press them into the mini muffin tin. Use your thumb or the back of a spoon to create a cozy indentation in the center of each cookie.
Step 4: Bake to Perfection
Pop the tin into the oven for 10-12 minutes. The edges should look set and slightly firm. Once out of the oven, gently press the centers again to maintain the cup shape. Let them cool completely in the tin.
Step 5: Fill with Marshmallow Goodness
Nestle mini marshmallows or a generous dollop of marshmallow fluff into the center of each cookie cup.
Step 6: Decorate with Chocolate Magic
Melt chocolate chips and drizzle them over the marshmallow filling. While the chocolate is still soft, sprinkle with festive toppings like:For a cute handle, cut candy canes into tiny pieces and attach them to the side of each cup using melted chocolate.
Step 7: Let Them Set
Allow the cookie cups to set at room temperature or speed up the process in the refrigerator.
Step 8: Serve and Savor
Bring these adorable treats to room temperature and enjoy every delightful bite!
Tips for Rich, Gooey Cookie Cups
Storing Hot Chocolate Cookie Cups for Later
Best Bites to Pair with Cookie Cups
Customize Your Cookie Cups with These Ideas
Everything You Want to Know About Cookie Cups
Grease the mini muffin tin thoroughly with cooking spray or butter before pressing the dough into the cavities. Using a non-stick tin also helps ensure easy removal.
Yes, you can prepare the cookie cups in advance. Bake and cool them completely, then store in an airtight container at room temperature for up to 3 days before filling and decorating.
Ensure your dough is well-mixed and not too dry. If cracks appear, gently press the edges back together while the cookies are still warm. The warmth will help seal any small cracks.
While a mini muffin tin creates the perfect cup shape, you can use a regular muffin tin or silicone molds. Just adjust the dough amount and baking time accordingly.
Print
Hot Chocolate Cookie Cups Recipe
- Total Time: 1 hour
- Yield: 24 1x
Description
Sweet holiday magic happens when mouthwatering Hot Chocolate Cookie Cups bring festive cheer to dessert tables. Rich chocolate cookies cradle marshmallow-topped cocoa ganache, creating irresistible bite-sized treats that delight winter gatherings.
Ingredients
Main Ingredients:
- 1 cup (225 g / 8 ounces) unsalted butter, softened
- 2 large eggs
- 2 ½ cups (315 g / 11.1 ounces) all-purpose flour
- 1 cup (200 g / 7 ounces) granulated sugar
- ½ cup (100 g / 3.5 ounces) brown sugar
- ¾ cup (90 g / 3.2 ounces) cocoa powder
Chocolate and Dairy:
- 1 cup (170 g / 6 ounces) semi-sweet chocolate chips
- ½ cup (120 ml / 4 fluid ounces) heavy cream
- White chocolate, melted (optional, for drizzle)
Flavor Enhancers and Toppings:
- 1 teaspoon vanilla extract
- 1 teaspoon baking soda
- ½ teaspoon salt
- Mini marshmallows
- Crushed candy canes (optional)
Instructions
- Prepare the oven by heating to 350F (175C) and thoroughly coat a mini muffin tin with non-stick spray.
- Combine dry ingredients including flour, cocoa powder, baking powder, and salt in a mixing bowl. In a separate large bowl, thoroughly cream butter with granulated and brown sugars until achieving a light, airy texture. Incorporate eggs and vanilla extract, then gradually fold in the dry ingredient mixture until a cohesive dough forms.
- Portion the dough into small, uniform spheres. Gently press each ball into the muffin cavities, using fingers or a small spoon to create a deep central indentation.
- Transfer the muffin tin to the preheated oven and bake for 10-12 minutes until the cookie edges appear firm and slightly crisp. Upon removing from the oven, immediately re-press the centers to maintain the cup-like shape. Allow complete cooling within the tin.
- Fill each cooled cookie cup with mini marshmallows or a generous dollop of marshmallow fluff, ensuring an even distribution.
- Melt chocolate chips and carefully drizzle over the marshmallow centers. While the chocolate remains liquid, sprinkle with decorative elements like festive sprinkles or crushed candy canes. For an optional whimsical touch, attach small candy cane segments as handles using additional melted chocolate.
- Allow the decorated cookie cups to solidify at room temperature or expedite the process by placing in the refrigerator.
- Serve at ambient temperature and relish these charming, bite-sized confections.
Notes
- Choose mini muffin tins with non-stick coating to prevent cookies from sticking and ensure easy removal.
- Use room temperature butter and eggs for smoother, more consistent dough that blends effortlessly.
- Press cookie dough gently when creating cups to maintain delicate walls without tearing or cracking.
- Experiment with gluten-free flour blend for those with wheat sensitivities, maintaining the same rich chocolate flavor.
- Cool cookies completely in the tin to help them maintain their structural integrity and prevent crumbling.
- Swap marshmallow filling with dairy-free alternatives like coconut cream for vegan-friendly options.
- Customize chocolate drizzle by using white, dark, or milk chocolate to match personal preferences.
- Store cookie cups in an airtight container at room temperature for up to 3 days to preserve texture and taste.
- Prep Time: 20 minutes
- Cook Time: 40 minutes
- Category: Desserts, Snacks, Drinks
- Method: Baking
- Cuisine: American
Nutrition
- Serving Size: 24
- Calories: 190
- Sugar: 11 g
- Sodium: 70 mg
- Fat: 9 g
- Saturated Fat: 5 g
- Unsaturated Fat: 4 g
- Trans Fat: 0 g
- Carbohydrates: 25 g
- Fiber: 1 g
- Protein: 2 g
- Cholesterol: 30 mg
Jamie Granger
Recipe Developer & Food Writer
Expertise
Education
Culinary Institute of America
Jamie Granger turns ingredients into memories. With her recipes, she brings a fusion-forward flair to every creation.
Her dishes reflect the places she’s explored, the chefs she’s learned from, and the deep connection she has to food as a form of expression.
At Pass and Provision, Jamie develops recipes that balance flavor, health, and beauty, meals that don’t just satisfy your appetite but speak to your curiosity.