
Sizzling Grilled Cheese Burrito Recipe: Cozy Comfort in Every Bite
Mild cheese melts perfectly in this innovative grilled cheese burrito that promises culinary excitement.
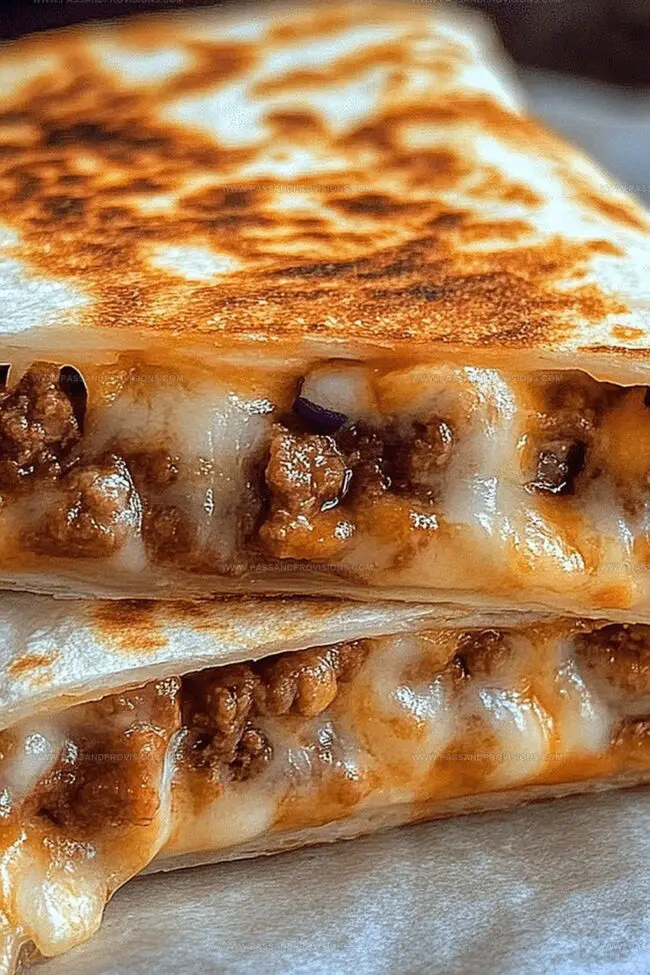
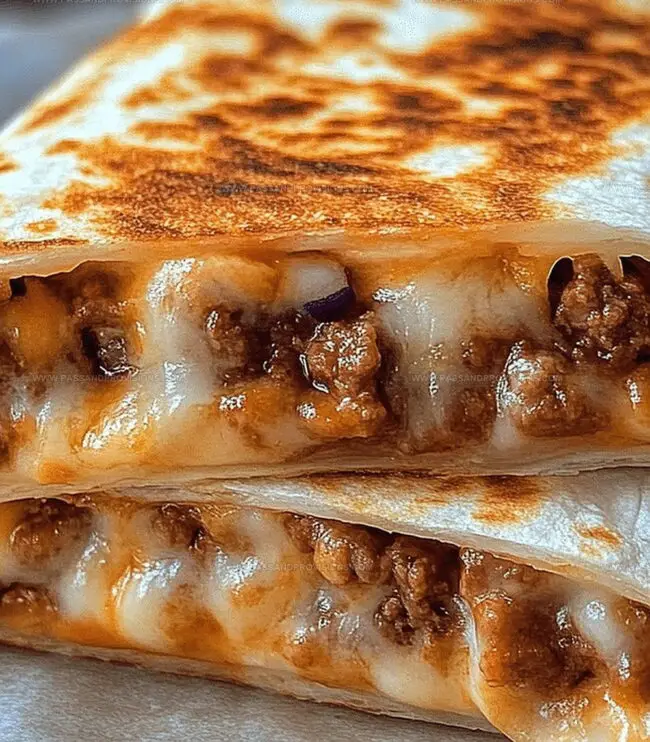
Crispy tortillas wrap around gooey ingredients for an unexpected twist.
Mexican-inspired flavors dance through each delectable bite.
Comfort food meets trendy cuisine in a mashup you’ll absolutely adore.
Weekend cooking becomes an adventure with this simple yet impressive dish.
Melted cheese, seasoned proteins, and crisp edges make every mouthful irresistible.
Grab your skillet and prepare for a meal that breaks all the traditional rules.
Why the Grilled Cheese Burrito Hits the Spot
Ingredients for the Perfect Grilled Cheese Burrito
Protein Base:Seasoning:Cooking Fat:How to Make a Grilled Cheese Burrito
Step 1: Sizzle Ground Beef
Heat olive oil in a skillet over medium heat. Add ground beef and cook until it’s nicely browned, using a spoon to break it into small crumbly pieces.
Step 2: Spice Up The Meat
Drain any excess grease from the beef. Sprinkle taco seasoning over the meat and add water. Let the mixture simmer for about 5 minutes until it thickens and the flavors meld together.
Step 3: Warm The Tortilla
Place a large flour tortilla on a clean surface. Spread a layer of shredded cheese across the center of the tortilla.
Step 4: Layer Delicious Fillings
Add the spiced ground beef on top of the cheese. Then pile on additional toppings:Step 5: Roll Into A Burrito
Fold the sides of the tortilla inward, then roll the burrito tightly from bottom to top, ensuring all ingredients are securely tucked inside.
Step 6: Grill To Golden Perfection
Melt butter in a skillet over medium heat. Place the burrito seam-side down and grill until the tortilla turns golden brown and crispy, about 2-3 minutes on each side.
Step 7: Slice And Serve
Remove from heat, let cool for a moment, then slice diagonally. Serve immediately with extra salsa or guacamole on the side.
Tips for Melty Grilled Cheese Burritos
How to Keep Grilled Cheese Burritos Tasty
What to Pair with a Grilled Cheese Burrito
Flavor Variations on the Grilled Cheese Burrito
Grilled Cheese Burrito FAQs
Monterey Jack or cheddar cheese are excellent choices, melting smoothly and providing rich flavor that complements the beef perfectly.
Absolutely! Replace ground beef with plant-based meat alternatives or black beans for a delicious vegetarian version that maintains the same texture and taste profile.
Use a dry, hot skillet and press the burrito firmly while grilling to create a crispy, golden-brown exterior that seals in the ingredients and prevents sogginess.
While taco seasoning adds authentic Mexican-inspired flavor, you can create a custom blend using chili powder, cumin, paprika, garlic powder, and salt if you prefer homemade or have dietary restrictions.
Print
Grilled Cheese Burrito Recipe
- Total Time: 25 minutes
- Yield: 4 1x
Description
Taco Bell’s grilled cheese burrito blends melted cheese, savory beef, and zesty sauces in a crispy tortilla wrap. Comfort food meets Mexican-inspired flavors, creating a delicious fusion that satisfies cravings and brings excitement to your mealtime.
Ingredients
Protein and Meat:
- 1 pound (1 lb) ground beef
Main Cheese and Dairy:
- ½ cup nacho cheese sauce (store-bought or homemade)
- ½ cup shredded cheddar cheese
- ½ cup shredded Monterey Jack cheese
- 1 cup shredded cheddar cheese (for the outside)
- ½ cup sour cream
Seasonings, Spices, and Additional Ingredients:
- 1 tablespoon olive oil
- 1 packet (or 2 tablespoons) taco seasoning
- ½ cup water
- 1 cup cooked rice (optional, for extra filling)
- ½ cup tortilla strips (or crushed tortilla chips)
- 1 tablespoon mayonnaise
- 1 teaspoon lime juice
- 1 teaspoon chipotle powder (or adobo sauce from canned chipotles)
- ½ teaspoon garlic powder
- ½ teaspoon smoked paprika
- Pinch of salt
Wrapping and Grilling:
- 4 large flour tortillas
- 1 tablespoon butter (for grilling)
Instructions
- Warm a skillet over medium flame and drizzle olive oil to coat the surface.
- Introduce ground beef to the pan, crumbling and browning thoroughly while stirring continuously to ensure even cooking.
- After meat reaches a rich brown color, carefully drain accumulated grease to reduce excess fat.
- Sprinkle taco seasoning across the beef, immediately introducing water and allowing the mixture to gently simmer.
- Let the beef and seasoning blend meld together, stirring occasionally until the liquid reduces and creates a thick, cohesive sauce.
- Continue cooking for approximately 5 minutes, ensuring the meat is fully infused with robust taco flavor and the consistency becomes slightly glossy and clingy.
- Remove the seasoned beef from heat, letting it rest momentarily to absorb remaining moisture and concentrate its savory profile.
Notes
- Choose lean ground beef to reduce excess grease and create a cleaner filling.
- Homemade taco seasoning allows you to control salt and spice levels for a personalized flavor profile.
- Drain beef thoroughly to prevent soggy burrito texture and maintain a crisp grilled exterior.
- Consider plant-based ground meat alternatives for a vegetarian version that delivers similar texture and taste.
- Prep Time: 10 minutes
- Cook Time: 15 minutes
- Category: Lunch, Snacks
- Method: Sautéing
- Cuisine: Mexican
Nutrition
- Serving Size: 4
- Calories: 748
- Sugar: 4 g
- Sodium: 1165 mg
- Fat: 42 g
- Saturated Fat: 19 g
- Unsaturated Fat: 18 g
- Trans Fat: 1 g
- Carbohydrates: 57 g
- Fiber: 2 g
- Protein: 36 g
- Cholesterol: 105 mg
Jamie Granger
Recipe Developer & Food Writer
Expertise
Education
Culinary Institute of America
Jamie Granger turns ingredients into memories. With her recipes, she brings a fusion-forward flair to every creation.
Her dishes reflect the places she’s explored, the chefs she’s learned from, and the deep connection she has to food as a form of expression.
At Pass and Provision, Jamie develops recipes that balance flavor, health, and beauty, meals that don’t just satisfy your appetite but speak to your curiosity.