
Jolly Striped Peppermint Sandwich Cookies Recipe for the Holidays
Whipping up delightful striped peppermint sandwich cookies brings pure winter magic to your kitchen!
Sweet memories of holiday cheer sparkle in every delicate bite.
Festive flavors dance between crisp, buttery wafers that crackle with peppermint’s cool intensity.
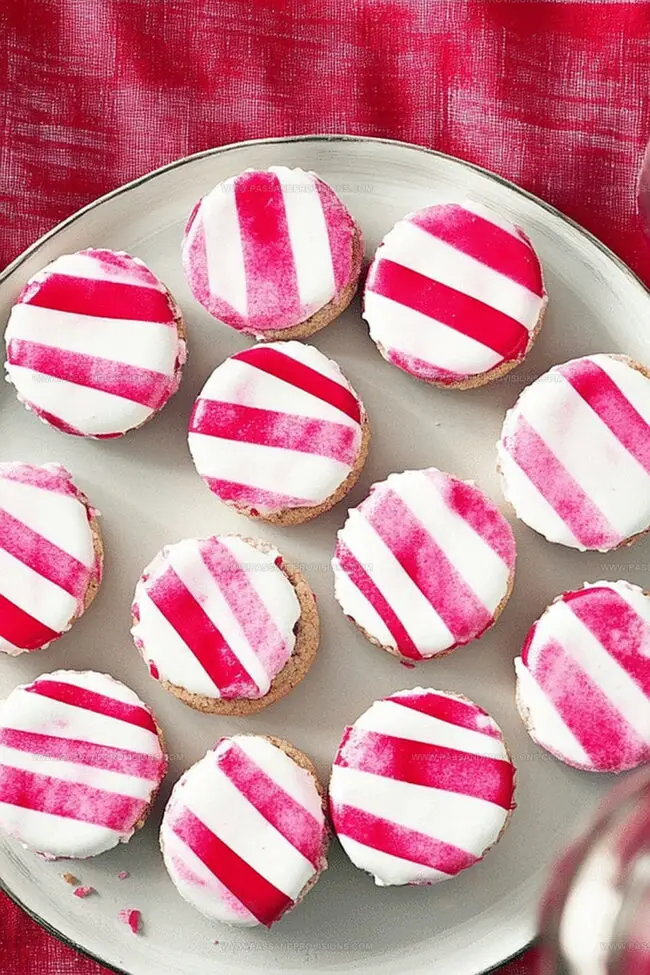
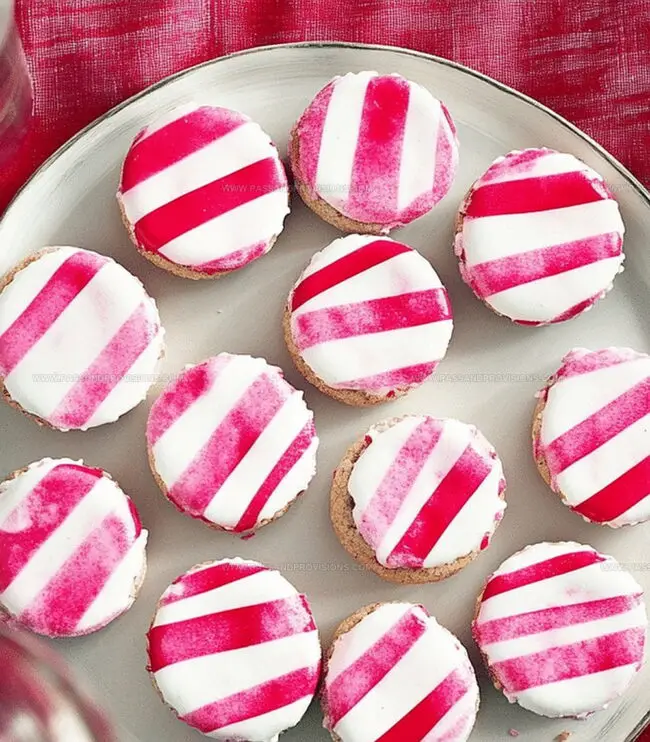
Delicate swirls of red and white create a mesmerizing visual treat that captivates both young and old.
Soft cream filling nestles between thin, perfectly crafted cookie layers for an irresistible texture.
Creamy peppermint notes whisper hints of nostalgia with each delectable morsel.
These charming cookies promise to become an instant favorite that everyone will adore.
Bake a batch and watch smiles bloom across faces eager to savor this delightful confection.
Peppermint Sandwich Cookies with Bold Layers
Everything You’ll Need for Peppermint Cookies
Base Ingredients:Flavor and Binding Ingredients:Finishing and Coloring Ingredients:Instructions for Assembling Striped Sandwiches
Step 1: Cream Butter and Sugar
In a spacious mixing bowl, whip softened butter and sugar together until the mixture becomes airy and fluffy, creating a smooth base for your cookies.
Step 2: Add Flavor Boosters
Pour in:Blend thoroughly until all ingredients are perfectly combined.
Step 3: Mix Dry Ingredients
In a separate bowl, whisk together:Slowly incorporate the dry mixture into the wet ingredients, stirring until a soft, pliable dough emerges.
Step 4: Create Festive Color Swirl
Separate the dough into two equal portions. Take one half and add red gel food coloring, kneading gently until the color distributes evenly throughout the dough, creating a vibrant striped effect.
Step 5: Shape Cookie Layers
Roll out both white and red dough sections on parchment paper. Layer them carefully, pressing gently to create an alternating striped pattern.
Step 6: Chill Dough
Wrap the striped dough in plastic wrap and refrigerate for about 30 minutes to firm up and enhance the color contrast.
Step 7: Cut and Bake Cookies
Slice the chilled dough into uniform rounds. Arrange on a baking sheet lined with parchment paper. Bake in a preheated oven until edges are lightly golden.
Step 8: Cool and Sandwich
Allow cookies to cool completely. Create sandwich cookies by spreading a creamy peppermint filling between two matching striped cookies.
Cookie Tips for Crisp and Results
Store These Cookies
What Complements Peppermint Cookies
Cookie Twists for Color and Flavor
Peppermint Cookie FAQs
Alternate the red and white dough strips and gently press them together before rolling out. This creates a beautiful candy cane-like striped effect throughout the cookie.
Yes, you can prepare the dough up to 3 days in advance and store it wrapped in plastic in the refrigerator. This allows the flavors to develop and makes the dough easier to handle.
Use pure peppermint extract for the most authentic and intense flavor. Avoid artificial extracts that can taste chemical or overpowering.
No special tools are required. Just use your hands to carefully layer and press the red and white dough together, then roll it out gently to create the striped pattern.
Print
Striped Peppermint Sandwich Cookies Recipe
- Total Time: 40 minutes
- Yield: 24 1x
Description
Sweet peppermint sandwich cookies deliver classic holiday cheer with creamy filling nestled between delicate, crisp chocolate wafers. Cool mint and rich chocolate create perfect winter comfort for cookie enthusiasts seeking festive seasonal delights.
Ingredients
Primary Ingredients:
- 1 cup (227 grams) unsalted butter, softened
- 2 ½ cups (313 grams) all-purpose flour
- 1 cup (200 grams) granulated sugar
- 1 large egg
Flavoring and Extracts:
- 1 teaspoon vanilla extract
- ½ teaspoon peppermint extract
- ½ teaspoon baking powder
- ¼ teaspoon salt
- Red gel food coloring
Filling and Garnish Ingredients:
- ½ cup (114 grams) unsalted butter, softened
- 2 cups (240 grams) powdered sugar
- 3 tablespoons heavy cream (as needed for consistency)
- Crushed peppermint candies (optional, for garnish)
Instructions
- Cream butter and sugar in a spacious mixing vessel until the mixture achieves a voluminous and airy consistency.
- Incorporate egg, vanilla essence, and peppermint extract, blending thoroughly until uniformly combined.
- In a separate container, sift together flour, baking powder, and salt, creating a delicate dry mixture.
- Gradually fold the dry ingredients into the wet ingredients, gently mixing until a supple, cohesive dough emerges.
- Separate the dough into two equal portions, ensuring precise division.
- Introduce vibrant red gel food coloring to one portion, massaging and kneading meticulously to ensure even pigmentation throughout the dough.
- Manipulate each dough section to achieve a consistent, smooth texture, preventing any streaking or uneven coloration.
- Wrap each dough portion in culinary film and refrigerate, allowing the mixture to firm and develop enhanced flavor complexity.
- Once chilled, roll out each dough segment to uniform thickness, creating pristine, geometrically precise cookie foundations.
- Cut the dough into precise shapes, alternating between white and red layers to create striking striped patterns.
- Position the cookie segments onto parchment-lined baking sheets, maintaining strategic spacing to prevent inadvertent merging during baking.
Notes
- Chill the dough for at least 1 hour to prevent spreading and maintain crisp stripes during baking.
- Use gel food coloring for vibrant, even color without changing the dough’s consistency.
- Create uniform cookies by rolling the dough between parchment paper and using a cookie cutter for precise shapes.
- For a gluten-free version, substitute all-purpose flour with a 1:1 gluten-free baking blend to maintain texture and flavor.
- Prep Time: 10 minutes
- Cook Time: 30 minutes
- Category: Desserts, Snacks
- Method: Baking
- Cuisine: American
Nutrition
- Serving Size: 24
- Calories: 180
- Sugar: 10 g
- Sodium: 80 mg
- Fat: 8 g
- Saturated Fat: 5 g
- Unsaturated Fat: 3 g
- Trans Fat: 0 g
- Carbohydrates: 25 g
- Fiber: 0 g
- Protein: 2 g
- Cholesterol: 30 mg
Jamie Granger
Recipe Developer & Food Writer
Expertise
Education
Culinary Institute of America
Jamie Granger turns ingredients into memories. With her recipes, she brings a fusion-forward flair to every creation.
Her dishes reflect the places she’s explored, the chefs she’s learned from, and the deep connection she has to food as a form of expression.
At Pass and Provision, Jamie develops recipes that balance flavor, health, and beauty, meals that don’t just satisfy your appetite but speak to your curiosity.