
Sweet Strawberry Chocolate Thumbprint Cookies Recipe for Bakers
Sweet memories collide with a delightful strawberry chocolate thumbprint cookies recipe that promises pure indulgence.
Soft, buttery dough cradles a luscious chocolate center, creating a perfect harmony of flavors.
Childhood nostalgia meets gourmet elegance in these irresistible treats.
Baking these cookies feels like wrapping yourself in a warm, comforting embrace.
Each bite delivers a magical blend of rich chocolate and fruity strawberry notes.
Homemade goodness awaits you, with a simple technique that turns ordinary ingredients into extraordinary delights.
Let’s embark on a delicious adventure that will make your taste buds dance with joy.
Strawberry Chocolate Thumbprint Cookies That Stun
What You’ll Need for Strawberry Chocolate Thumbprint Cookies
Main Ingredients:
Cookie Base:Filling and Topping:How to Bake Strawberry Chocolate Thumbprint Cookies
Step 1: Whip Up the Dough
In a spacious mixing bowl, blend softened butter and sugar until they transform into a light, airy mixture. Introduce egg yolk and vanilla extract, stirring until perfectly combined. Gradually fold in flour and salt, creating a tender, supple dough that promises delightful cookies.
Step 2: Chill and Relax the Dough
Encase the dough in plastic wrap, tucking it into the refrigerator for a cool rest between 30 minutes to an hour. This crucial pause allows the dough to firm up, making it easier to shape into delectable morsels.
Step 3: Prepare for Baking
Warm up the oven to 350 Fahrenheit (175 Celsius). Line baking sheets with parchment paper for easy cookie removal. Roll the chilled dough into adorable one-inch spheres, positioning them generously across the baking surface. Using your thumb or a small spoon, create a cozy indentation in each cookie’s center.
Step 4: Jam and Bake
Gently nestle strawberry jam into the heart of each cookie:Slide the cookie-laden sheets into the oven, baking for 12-14 minutes until edges turn a delicate golden hue. Allow cookies to rest on the baking sheet for five minutes before transferring to a cooling rack.
Step 5: Chocolate Finale
Melt chocolate chips with coconut oil in the microwave:Stir in 20-second intervals until silky smooth. Drizzle the molten chocolate across the cooled cookies using a spoon or piping bag. Let the chocolate set completely before serving these irresistible treats.
Secrets for Better Strawberry Chocolate Thumbprint Cookies
Keep Strawberry Chocolate Thumbprint Cookies Fresh
Drinks and Treats That Pair with Strawberry Chocolate Thumbprints
Flavor Swaps for Strawberry Chocolate Thumbprint Cookies
Thumbprint Cookie FAQs
Yes, but reduce the added salt in the recipe to prevent the cookies from becoming too salty. The flavor will be slightly different, but still delicious.
The butter and sugar mixture should look light, fluffy, and pale yellow. It should increase in volume and appear almost whipped, which takes about 2-3 minutes of mixing.
If the dough cracks, it might be too cold or dry. Let it sit at room temperature for a few minutes to soften, or gently smooth the cracks with your fingers while creating the thumbprint.
Absolutely! While strawberry jam works perfectly, you can experiment with raspberry, apricot, or even mixed berry jam to create different flavor profiles for your cookies.
Print
Strawberry Chocolate Thumbprint Cookies Recipe
- Total Time: 34 minutes
- Yield: 24 1x
Description
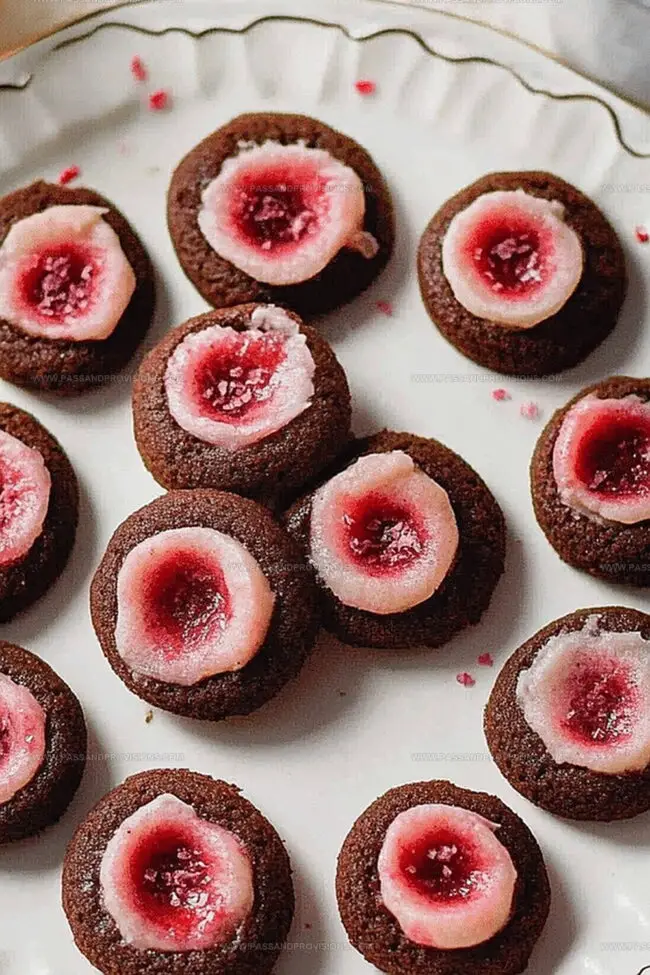
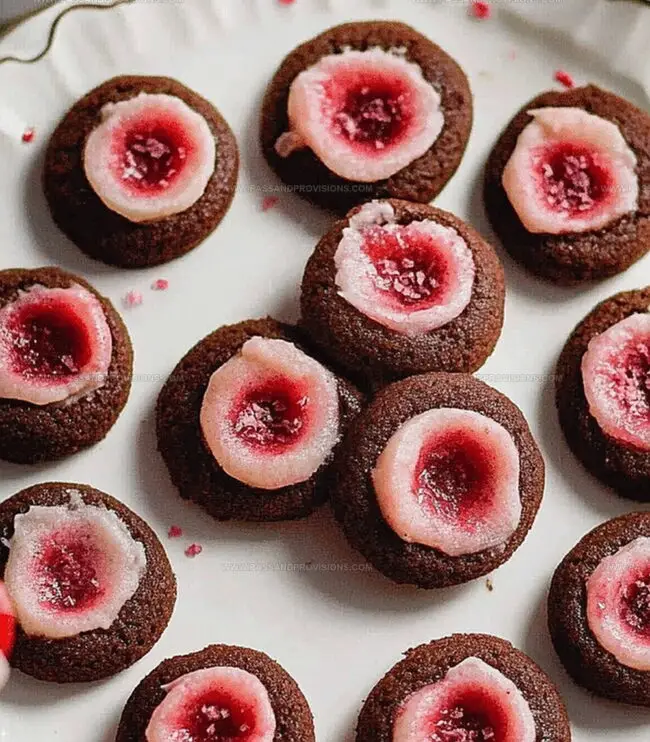
Indulgent strawberry chocolate thumbprint cookies showcase a delightful dance of rich chocolate and sweet strawberry jam nestled in buttery, crumbly cookies. Homemade goodness invites you to savor each delectable bite of this irresistible dessert.
Ingredients
Main Ingredients:
- 2 cups all-purpose flour
- 1 cup unsalted butter, softened (226 grams)
- ⅔ cup granulated sugar (133 grams)
Binding and Flavoring Ingredients:
- 1 large egg yolk
- 1 teaspoon vanilla extract
- ½ teaspoon salt
Filling and Topping Ingredients:
- ⅓ cup strawberry jam or preserves
- ½ cup semi-sweet chocolate chips (85 grams)
- 1 teaspoon coconut oil or vegetable oil
Instructions
- Prepare the cookie foundation by thoroughly blending softened butter and sugar until the mixture achieves a velvety, aerated consistency, approximately 2-3 minutes using an electric mixer.
- Incorporate egg yolk and vanilla extract, mixing until the ingredients are seamlessly integrated.
- Gradually fold in flour and salt, gently combining until a smooth, pliable dough emerges.
- Encase the dough in plastic wrap and refrigerate for 30-60 minutes, allowing it to firm and develop enhanced texture.
- Heat the oven to 350F (175C) and arrange parchment paper on baking sheets.
- Craft uniform dough spheres, each measuring roughly 1 inch in diameter, positioning them systematically across the prepared baking surfaces with adequate spacing.
- Create gentle indentations in the cookie centers using your thumb or a compact spoon, forming small wells for filling.
- Delicately spoon strawberry jam into each cookie’s central depression, ensuring precise and measured placement.
- Transfer the cookies to the preheated oven, baking for 12-14 minutes until edges acquire a golden, crisp appearance.
- Allow cookies to rest on the baking sheet for 5 minutes, facilitating initial cooling and stabilization.
- Carefully relocate cookies to a wire cooling rack for complete temperature reduction.
- Melt chocolate chips and coconut oil in short microwave intervals, stirring between each to achieve a smooth, glossy consistency.
- Elegantly drizzle the molten chocolate across the cooled cookies, creating artistic patterns using a spoon or piping implement.
- Permit the chocolate decoration to solidify completely before serving or storing.
Notes
- Chill the dough thoroughly to prevent spreading and maintain the cookie’s shape during baking.
- Use room temperature butter for smoother creaming and better cookie texture.
- For gluten-free option, substitute all-purpose flour with almond or gluten-free flour blend, ensuring a 1:1 ratio.
- Control indentation depth by using the back of a measuring spoon for consistent, even cookie centers.
- Prep Time: 20 minutes (+30 minutes chilling)
- Cook Time: 14 minutes
- Category: Desserts, Snacks
- Method: Baking
- Cuisine: American
Nutrition
- Serving Size: 24
- Calories: 130
- Sugar: 6g
- Sodium: 50mg
- Fat: 7g
- Saturated Fat: 4g
- Unsaturated Fat: 2g
- Trans Fat: 0g
- Carbohydrates: 16g
- Fiber: 0.5g
- Protein: 1.5g
- Cholesterol: 15mg
Jamie Granger
Recipe Developer & Food Writer
Expertise
Education
Culinary Institute of America
Jamie Granger turns ingredients into memories. With her recipes, she brings a fusion-forward flair to every creation.
Her dishes reflect the places she’s explored, the chefs she’s learned from, and the deep connection she has to food as a form of expression.
At Pass and Provision, Jamie develops recipes that balance flavor, health, and beauty, meals that don’t just satisfy your appetite but speak to your curiosity.