
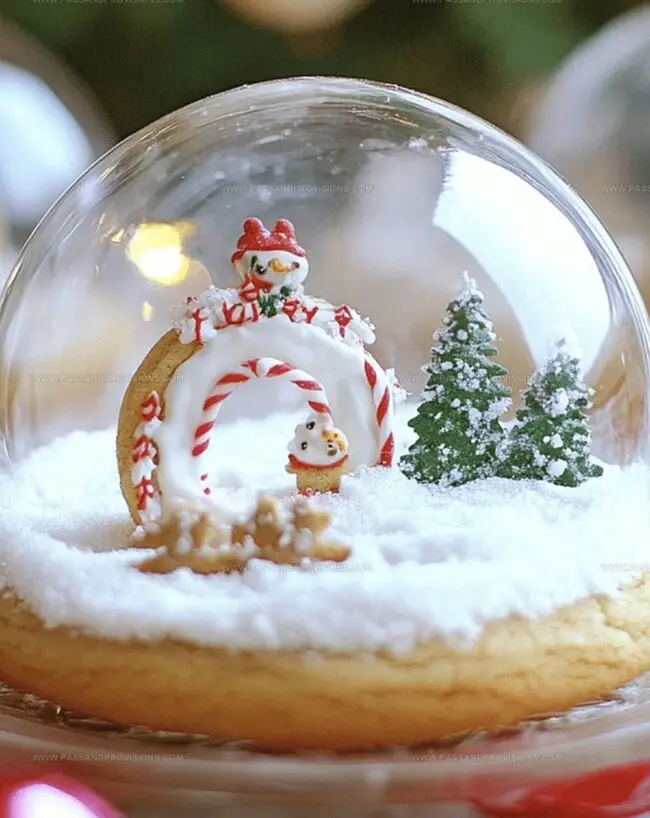
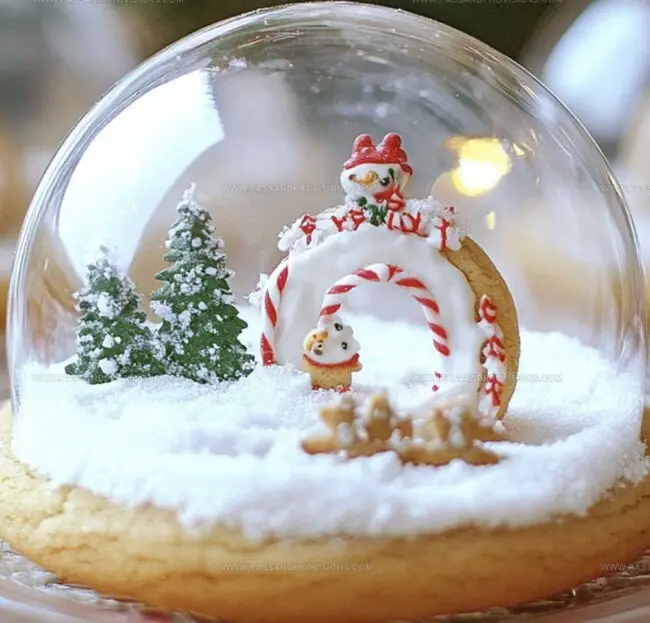
Enchanting Snow Globe Cookies Recipe: Winter Magic in Every Bite
Crafting whimsical snow globe cookies brings magic right to your kitchen countertop.
Delicate sugar cookies become miniature winter wonderlands waiting to enchant.
Sparkling decorations and creative techniques transform simple treats into edible art pieces.
Soft royal icing creates smooth landscapes reminiscent of peaceful mountain scenes.
Edible glitter and translucent sugar work like delicate frost crystals.
Professional bakers and home cooks can master these charming desserts with simple steps.
You’ll feel like a pastry artist designing these delightful seasonal sweets.
Dive into this playful recipe and let your imagination dance across each delectable cookie.
Why Snow Globe Cookies Are a Holiday Favorite
Ingredients Behind Snow Globe Cookies
Dry Ingredients:Wet Ingredients:Decorative Ingredients:How to Make Snow Globe Cookies at Home
Step 1: Whisk Dry Ingredients
In a bowl, combine flour, baking powder, and salt. Mix thoroughly to distribute ingredients evenly.
Step 2: Cream Butter and Sugar
Beat butter and sugar in a separate large bowl until mixture becomes light and airy with a creamy texture.
Step 3: Add Liquid Ingredients
Mix in egg and vanilla extract until well blended, creating a smooth base for the cookie dough.
Step 4: Combine Wet and Dry Mixtures
Gradually fold dry ingredients into wet mixture, stirring until a consistent dough forms.
Step 5: Chill Cookie Dough
Step 6: Prepare Baking Station
Preheat oven to 350 degrees Fahrenheit. Line baking sheets with parchment paper.
Step 7: Roll and Cut Base Cookies
Roll chilled dough to quarter-inch thickness. Use round cookie cutter to create circular base cookies.
Step 8: Create Cookie Frames
Use smaller cutter to remove center from half of the cookies, forming delicate frame shapes.
Step 9: Add Candy Glass
Fill frame cookie centers with crushed clear candies.
Step 10: Bake Cookies
Place cookies on prepared baking sheets. Bake 8-10 minutes until edges turn golden brown.
Step 11: Cool and Set
Allow cookies to cool completely on baking sheet, ensuring candy centers harden.
Step 12: Assemble Snow Globes
Step 13: Final Assembly
Attach candy frame cookie on top using royal icing. Let set completely.
Step 14: Present and Enjoy
Display as decorative treats or package as delightful homemade gifts.
Snow Globe Cookie Tips for Success
How to Store and Keep Snow Globe Cookies Pretty
Fun Pairings for Snow Globe Cookies
Snow Globe Cookie Design Ideas
Gluten-Free Snow Globe Cookies: Replace wheat flour with gluten-free flour blend, ensuring all ingredients are certified gluten-free for celiac-friendly treats.
Vegan Winter Wonderland Cookies: Substitute butter with coconut oil, use flax egg instead of regular egg, and select plant-based royal icing for dairy-free alternative.
Chocolate Snow Globe Cookies: Add cocoa powder to the base dough for rich chocolate flavor, using dark chocolate candy pieces for the glass center and chocolate royal icing.
Low-Sugar Holiday Cookies: Use sugar substitute like stevia or monk fruit sweetener, reducing overall sugar content while maintaining the classic cookie texture and festive design.
Questions Snow Globe Cookie Fans Ask
Use finely crushed clear hard candies like Jolly Ranchers and spread them evenly in the center cutout. Watch the cookies closely during baking and remove them as soon as the edges turn light golden to prevent burning the candy glass.
Yes, you can prepare the cookie dough up to 3 days in advance and store it wrapped in the refrigerator. The assembled snow globe cookies can be made 2-3 days before serving and kept in an airtight container at room temperature.
Hard clear candies like Jolly Ranchers or clear fruit-flavored hard candies work perfectly. Crush them into fine pieces before filling the cookie cutout to create a transparent glass-like effect when baked.
You’ll need round cookie cutters in different sizes, a smaller snowflake or round cutter for the center, parchment paper, and royal icing for assembling. A rolling pin and clean work surface are also essential for rolling out the dough evenly.
Print
Snow Globe Cookies Recipe
- Total Time: 40 minutes
- Yield: 24 1x
Description
Festive snow globe cookies bring winter magic to your dessert table with delicate sugar cookie bases and sparkling royal icing decorations. Delightful miniature scenes capture holiday cheer while offering a whimsical treat you’ll treasure and share with loved ones.
Ingredients
Base Ingredients:
- 2 ¾ cups (350 g) all-purpose flour
- 1 cup (225 g) unsalted butter, softened
- 1 cup (200 g) granulated sugar
- 1 large egg
Leavening and Seasoning Ingredients:
- 1 teaspoon baking powder
- ½ teaspoon salt
- 1 ½ teaspoons vanilla extract
Decorative Ingredients:
- ½ cup (100 g) clear hard candies (e.g., Jolly Ranchers or clear mints)
- Royal icing (store-bought or homemade)
- Festive sprinkles, small edible decorations, or mini holiday candies
Instructions
- Prepare the dry ingredients by whisking flour, baking powder, and salt in a medium mixing bowl.
- Cream butter and sugar in a large bowl until the mixture becomes pale and airy, achieving a light, fluffy texture.
- Incorporate egg and vanilla extract into the butter mixture, blending thoroughly.
- Gently fold dry ingredients into the wet mixture, mixing until a cohesive dough forms.
- Separate the dough into two equal disks, encase each in plastic wrap, and refrigerate for a minimum of 1 hour to firm up.
- Heat the oven to 350F (175C) and line baking sheets with parchment paper.
- Roll out chilled dough to a uniform 1/4-inch thickness on a lightly floured surface.
- Cut round base cookies using a 3-4 inch circular cutter, reserving half the rounds for cookie frames.
- Create cookie frames by cutting out smaller circles or snowflake shapes from the reserved rounds, leaving a decorative border.
- Carefully distribute crushed clear candies into the center cutouts of the frame cookies.
- Arrange base and frame cookies on prepared baking sheets, maintaining adequate spacing.
- Bake for 8-10 minutes until edges turn a delicate golden hue, allowing candies to melt and set.
- Allow cookies to cool completely on the baking sheet, ensuring the candy centers solidify.
- Construct snow globe cookies by applying royal icing to connect base and frame cookies.
- Embellish solid cookie bases with festive royal icing decorations, miniature candies, and sprinkles to create whimsical holiday scenes.
- Carefully position the candy-filled frame cookie atop the decorated base, securing with additional royal icing.
- Let cookies set entirely before presenting as charming edible gifts or decorative centerpieces.
Notes
- Chill the dough thoroughly to prevent spreading and maintain crisp cookie shapes during baking.
- Use transparent hard candies like Jolly Ranchers for the most vibrant and clear “glass” effect in snow globe cookies.
- Crush candies into fine, uniform pieces to ensure even melting and a smooth, glass-like finish in the cookie cutouts.
- Choose winter-themed sprinkles or small edible decorations that fit inside the snow globe frame for a charming, festive presentation.
- Prep Time: 30 minutes
- Cook Time: 10 minutes
- Category: Desserts
- Method: Baking
- Cuisine: American
Nutrition
- Serving Size: 24
- Calories: 200
- Sugar: 9 g
- Sodium: 90 mg
- Fat: 10 g
- Saturated Fat: 6 g
- Unsaturated Fat: 4 g
- Trans Fat: 0 g
- Carbohydrates: 27 g
- Fiber: 0 g
- Protein: 2 g
- Cholesterol: 30 mg
Jamie Granger
Recipe Developer & Food Writer
Expertise
Education
Culinary Institute of America
Jamie Granger turns ingredients into memories. With her recipes, she brings a fusion-forward flair to every creation.
Her dishes reflect the places she’s explored, the chefs she’s learned from, and the deep connection she has to food as a form of expression.
At Pass and Provision, Jamie develops recipes that balance flavor, health, and beauty, meals that don’t just satisfy your appetite but speak to your curiosity.