
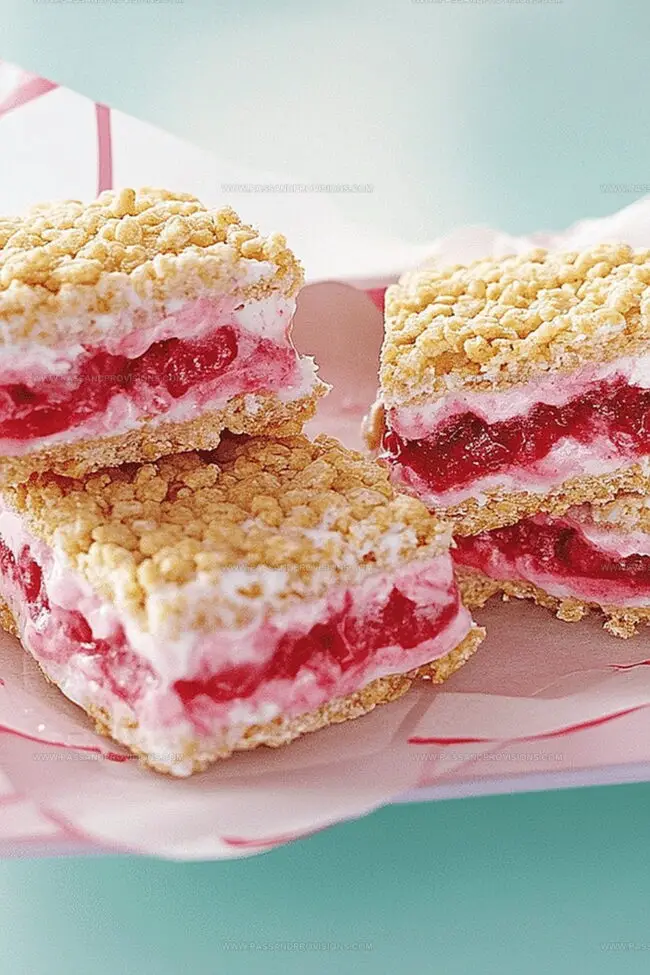
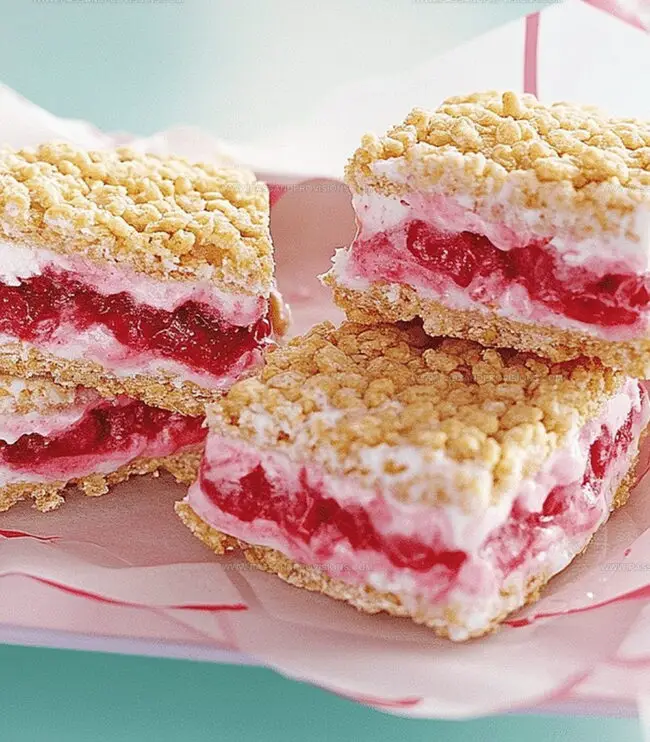
Playful PB&J Puffed Cereal Ice Cream Sandwiches Recipe
Homemade pb&j puffed cereal ice cream sandwiches deliver childhood nostalgia with a playful twist.
Sweet memories dance between crispy layers of nostalgic breakfast favorites.
Creamy peanut butter and strawberry jam swirl into a cool, dreamy dessert.
Crisp cereal edges provide delightful crunch against smooth, frozen filling.
Weekend treat makers can craft this simple yet spectacular snack in minutes.
Quick assembly means minimal kitchen effort for maximum deliciousness.
You’ll want to savor every single bite of this ingenious frozen delight.
PB&J Ice Cream Sandwiches with Crunch
Ingredients Behind This Frosty Sandwich Snack
Base Ingredients:Cereal Component:Optional Flavor Enhancers:Steps to Make These Kid-Approved Treats
Step 1: Melt Peanut Butter Mixture
Heat peanut butter, honey, and butter in a large saucepan over medium heat. Stir continuously until the ingredients:Blend until smooth and completely combined.
Step 2: Coat Cereal
Remove saucepan from heat. Gently fold puffed rice cereal into the melted mixture, ensuring every piece gets thoroughly coated.
Step 3: Create Base Layer
Prepare a 9×9-inch baking pan by lining it with parchment paper. Press half of the cereal mixture firmly and evenly across the bottom, creating a uniform base layer.
Step 4: Chill Base
Place the pan in the refrigerator for 15-20 minutes, allowing the base to set and firm up. Keep the remaining cereal mixture at room temperature for the top layer.
Step 5: Add Ice Cream Layer
Once the base is chilled, spread softened vanilla or strawberry ice cream evenly over the cereal base.
Step 6: Complete Sandwich
Top the ice cream with the remaining cereal mixture, pressing gently to create a complete sandwich. Return to the refrigerator to freeze for 2-3 hours.
Step 7: Slice and Serve
Remove the ice cream sandwich from the pan using parchment paper. Cut into squares and enjoy immediately.
Tips for Assembling with Ease
Store and Serve Ice Cream Sandwiches Right
Treats That Go Well with These Sandwiches
Tweak the Flavor Combo with These Variations
FAQs for Cereal Sandwich Lovers
Yes, you can substitute puffed rice cereal with other crispy cereals like Rice Krispies or corn flakes for a similar texture and crunch.
Absolutely! Homemade or store-bought peanut butter works well. Just ensure it’s smooth and creamy for the best mixing results.
Reduce the honey or corn syrup quantity by half, or use a sugar-free alternative like stevia to control the sweetness level.
No special equipment is required. Just a saucepan, square baking pan, parchment paper, and basic kitchen utensils will do the job perfectly.
Print
Pb&J Puffed Cereal Ice Cream Sandwiches Recipe
- Total Time: 4 hours 20 minutes
- Yield: 12 1x
Description
Cool summer memories collide with childhood favorite “PB&J Puffed Cereal Ice Cream Sandwiches” in this nostalgic dessert. Sweet and creamy layers between crispy cereal promise delightful bites that transport you back to simple, joyful moments.
Ingredients
Main Ingredients:
- 4 cups (946 ml) puffed rice cereal
- ½ cup (128 g) creamy peanut butter
- ½ cup (170 g) honey or light corn syrup
Binding Ingredients:
- 2 tablespoons (28 g) unsalted butter
Filling Ingredients:
- 1 pint (473 ml) vanilla ice cream, softened slightly
- ⅓ cup (106 g) strawberry or grape jelly
Instructions
- Prepare a 9-inch square baking pan by lining it with parchment paper, ensuring complete coverage of the bottom and sides for easy removal.
- In a spacious saucepan, combine peanut butter, honey, and butter over medium heat, stirring continuously until the mixture transforms into a silky, uniform liquid.
- Remove the saucepan from heat and introduce the puffed rice cereal, gently folding until every morsel is thoroughly enrobed in the luscious mixture.
- Transfer half of the cereal mixture into the prepared pan, using gentle but firm pressure to create an even, compact base layer that will serve as the foundation for the ice cream sandwich.
- Chill the pan in the refrigerator for approximately 15-20 minutes, allowing the base to solidify and develop structural integrity.
- Keep the remaining cereal mixture at room temperature, maintaining its workable consistency for the final layer of the sandwich.
- Once the base layer has set, carefully spread softened ice cream evenly across the surface, ensuring complete coverage and a smooth finish.
- Carefully apply the reserved cereal mixture on top of the ice cream, pressing gently to create a uniform top layer that will complete the sandwich.
- Return the assembled dessert to the freezer, allowing it to fully set and the flavors to meld together for at least 2-3 hours before slicing and serving.
Notes
- Swap honey for agave syrup or maple syrup to create a vegan-friendly version of these ice cream sandwiches.
- Use gluten-free puffed rice cereal to make the recipe suitable for those with gluten sensitivities.
- Chill the baking pan beforehand to help the cereal mixture set faster and create a more stable base layer.
- Experiment with different nut butters like almond or cashew butter for unique flavor variations that add depth to the classic PB&J profile.
- Prep Time: 20 minutes
- Cook Time: 4 hours
- Category: Desserts, Snacks
- Method: Baking
- Cuisine: American
Nutrition
- Serving Size: 12
- Calories: 200
- Sugar: 15g
- Sodium: 100mg
- Fat: 9g
- Saturated Fat: 3g
- Unsaturated Fat: 5g
- Trans Fat: 0g
- Carbohydrates: 28g
- Fiber: 1g
- Protein: 4g
- Cholesterol: 10mg
Jamie Granger
Recipe Developer & Food Writer
Expertise
Education
Culinary Institute of America
Jamie Granger turns ingredients into memories. With her recipes, she brings a fusion-forward flair to every creation.
Her dishes reflect the places she’s explored, the chefs she’s learned from, and the deep connection she has to food as a form of expression.
At Pass and Provision, Jamie develops recipes that balance flavor, health, and beauty, meals that don’t just satisfy your appetite but speak to your curiosity.