
No-Bake Kit Kat Cheesecakes Recipe: Cute Mini Treats for Everyone
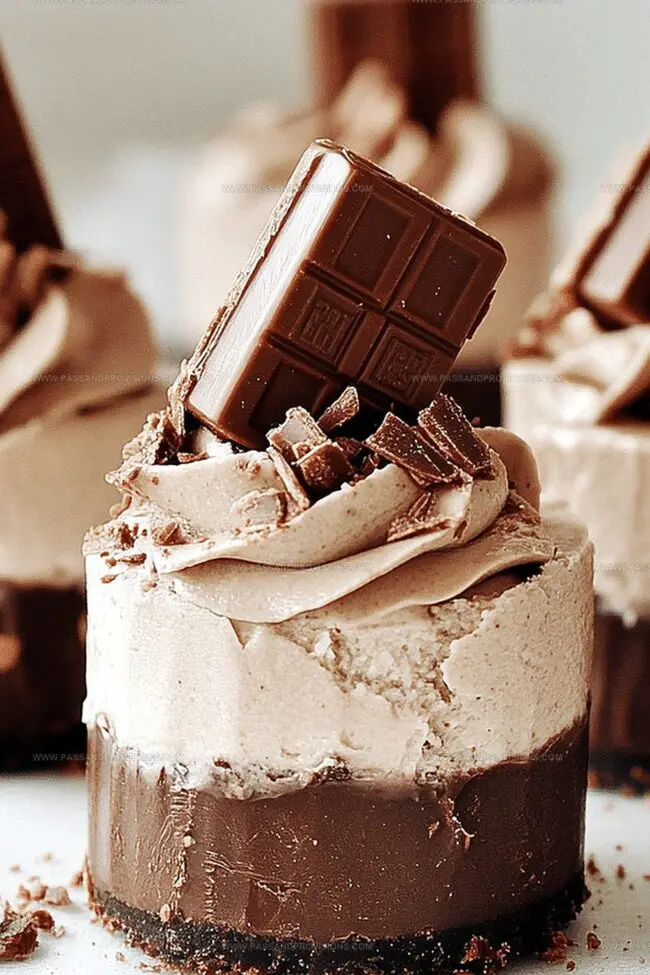
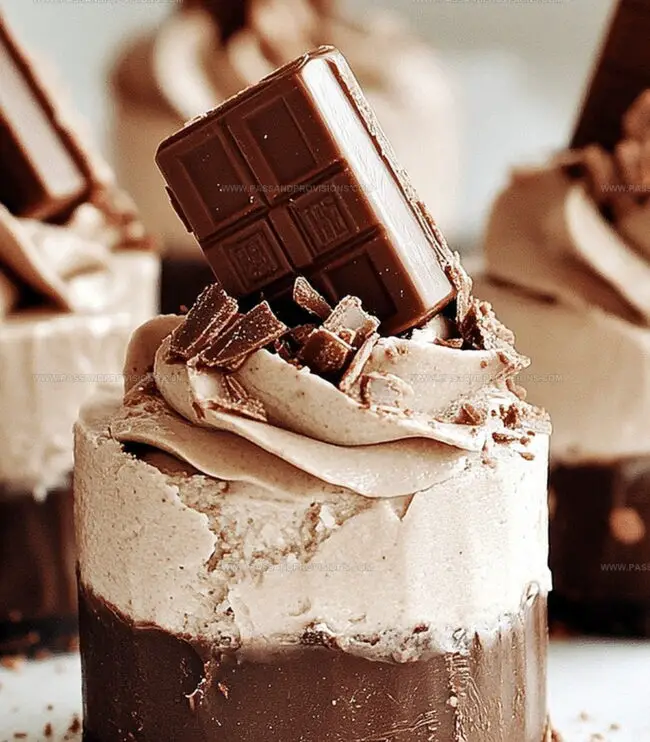
Sweet dreams come true with mini no-bake kit kat cheesecakes that promise pure indulgence.
Creamy layers of decadence blend perfectly with chocolate-covered wafer goodness.
Crunchy textures meet silky smooth cream cheese in these bite-sized delights.
Forget complicated desserts that demand hours of preparation.
Everyone can whip up these magical treats in minutes.
Rich chocolate and crisp wafer cookies create an irresistible combination that makes you weak at the knees.
You’ll fall head over heels for this simple yet stunning dessert that looks like it came from a fancy bakery.
Grab a spoon and let’s make something extraordinary!
Why You’ll Want to Try Mini No-Bake Kit Kat Cheesecakes
Ingredients for Mini No-Bake Kit Kat Cheesecakes
Base Ingredients:Dairy Components:Flavor Enhancers:How to Make Mini No-Bake Kit Kat Cheesecakes at Home
Step 1: Create Chocolatey Crust
Crush Kit Kat bars into fine crumbs. Mix crumbs with melted butter until well combined. Press mixture firmly into lined muffin tin cavities. Ensure an even, compact base. Refrigerate for 15 minutes to set.
Step 2: Whip Creamy Cheesecake Base
In a large mixing bowl, blend cream cheese until silky smooth. Add:Beat ingredients until completely incorporated and free of lumps.
Step 3: Prepare Fluffy Whipped Cream
In a separate clean bowl, whip heavy cream until stiff peaks form. Gently fold whipped cream into cheesecake mixture, maintaining its airy texture.
Step 4: Incorporate Chocolate Crunch
Chop additional Kit Kat bars into small pieces. Carefully fold chocolate chunks into cheesecake mixture, ensuring even distribution.
Step 5: Fill Cheesecake Cups
Spoon cheesecake mixture into chilled crust-lined muffin cups. Smooth tops with a spatula for a clean finish.
Step 6: Chill and Set
Place cheesecakes in refrigerator for minimum 4 hours. Allow to firm completely.
Step 7: Decorate and Serve
Garnish with:Serve chilled and enjoy the decadent treat!
Tips for Mini No-Bake Kit Kat Cheesecakes That Work
How to Store Mini No-Bake Kit Kat Cheesecakes
What to Serve with Mini No-Bake Kit Kat Cheesecakes
Fun Variations on Mini No-Bake Kit Kat Cheesecakes
FAQs About Mini No-Bake Kit Kat Cheesecakes
Yes, you can substitute Kit Kat with other chocolate bars like Twix or Crunch, but it will slightly change the overall flavor profile of the cheesecake.
No, you can use a hand mixer or even mix by hand with a whisk, though it might require more effort to achieve smooth cream cheese and whipped cream.
Absolutely! Kids love the chocolatey crunch and sweet cheesecake texture. Just be mindful of potential allergies to dairy or chocolate.
These mini cheesecakes can stay fresh in the refrigerator for up to 5 days when stored in an airtight container, maintaining their creamy texture and delicious taste.
Print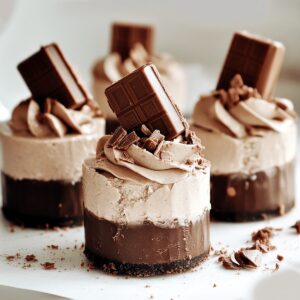
Mini No-Bake Kit Kat Cheesecakes Recipe
- Total Time: 4 hours 20 minutes
- Yield: 8 1x
Description
Kit Kat cheesecake squares offer chocolate lovers a dreamy dessert without turning on an oven. Small individual portions pack layers of creamy indulgence with crisp wafer textures, delivering rich chocolate bliss you cannot resist.
Ingredients
Main Ingredients:
- 14 Kit Kat bars (total: about 28 fingers)
- 8 ounces (225 grams) cream cheese, softened
- ½ cup heavy whipping cream
Sweeteners and Flavor Enhancers:
- ½ cup powdered sugar
- ½ teaspoon vanilla extract
Binding and Crust Ingredients:
- 2 tablespoons unsalted butter, melted
- Chocolate syrup (optional)
- Whipped cream (optional)
Instructions
- Craft a crumbly foundation by pulverizing Kit Kat bars with melted butter, pressing the mixture into lined muffin cavities to create a sturdy base. Refrigerate for a quarter-hour to solidify the crust.
- Whip cream cheese with powdered sugar and vanilla extract until achieving a velvety, lump-free consistency.
- Transform heavy cream into billowy peaks through vigorous whisking, then delicately incorporate into the cream cheese mixture using gentle folding techniques.
- Sprinkle roughly chopped Kit Kat fragments throughout the creamy blend, ensuring uniform distribution of chocolatey chunks.
- Carefully transfer the luscious cheesecake mixture atop the chilled crusts, using a spatula to create smooth, elegant surfaces.
- Allow the mini desserts to set and firm up by placing them in the refrigerator for a minimum of four hours, enabling the texture to stabilize and flavors to meld.
- Elevate the presentation by garnishing with additional Kit Kat pieces, drizzling rich chocolate syrup, and crowning with optional dollops of whipped cream for a decadent finishing touch.
Notes
- Use room temperature cream cheese to ensure a smooth, lump-free filling that blends effortlessly.
- Crush Kit Kat bars coarsely to maintain delightful chocolate and wafer texture throughout the cheesecake.
- For a gluten-free version, substitute regular Kit Kat with gluten-free chocolate wafer cookies and ensure all ingredients are certified gluten-free.
- Freeze individual cheesecakes for 30 minutes before serving to achieve a firmer, more defined texture that cuts cleanly and looks picture-perfect.
- Prep Time: 20 minutes
- Cook Time: 4 hours
- Category: Desserts, Snacks
- Method: None
- Cuisine: American
Nutrition
- Serving Size: 8
- Calories: 330
- Sugar: 22g
- Sodium: 150mg
- Fat: 24g
- Saturated Fat: 14g
- Unsaturated Fat: 9g
- Trans Fat: 0g
- Carbohydrates: 29g
- Fiber: 1g
- Protein: 4g
- Cholesterol: 60mg
Jamie Granger
Recipe Developer & Food Writer
Expertise
Education
Culinary Institute of America
Jamie Granger turns ingredients into memories. With her recipes, she brings a fusion-forward flair to every creation.
Her dishes reflect the places she’s explored, the chefs she’s learned from, and the deep connection she has to food as a form of expression.
At Pass and Provision, Jamie develops recipes that balance flavor, health, and beauty, meals that don’t just satisfy your appetite but speak to your curiosity.