
Crispy Honey Garlic Chicken Recipe for Busy Nights
Weaving magic with crispy honey garlic chicken creates an irresistible dinner sensation that sparks immediate kitchen excitement.
Culinary adventures often begin with unexpected flavor combinations that surprise and delight.
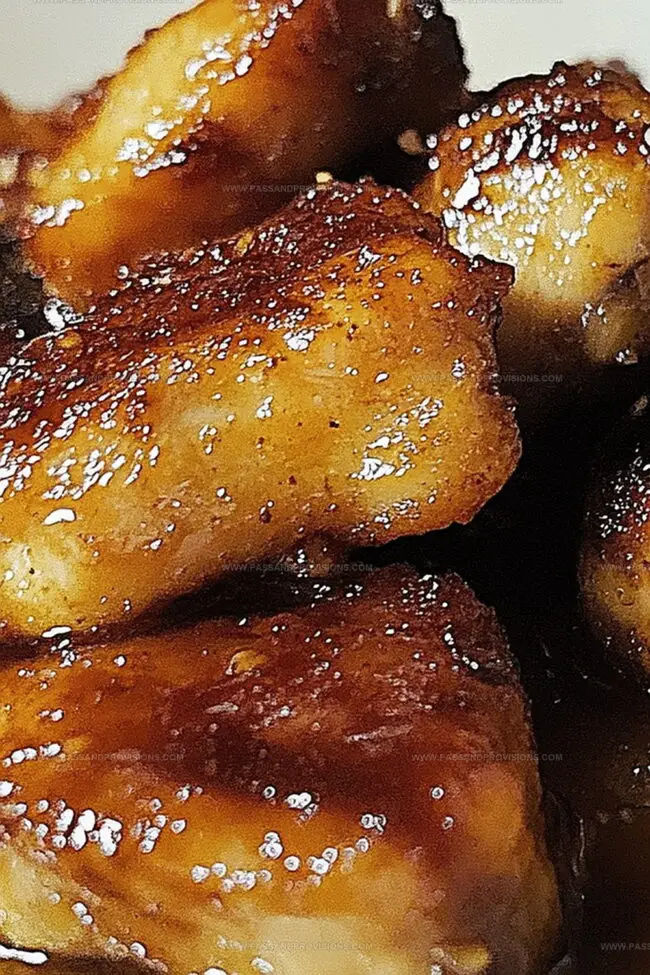
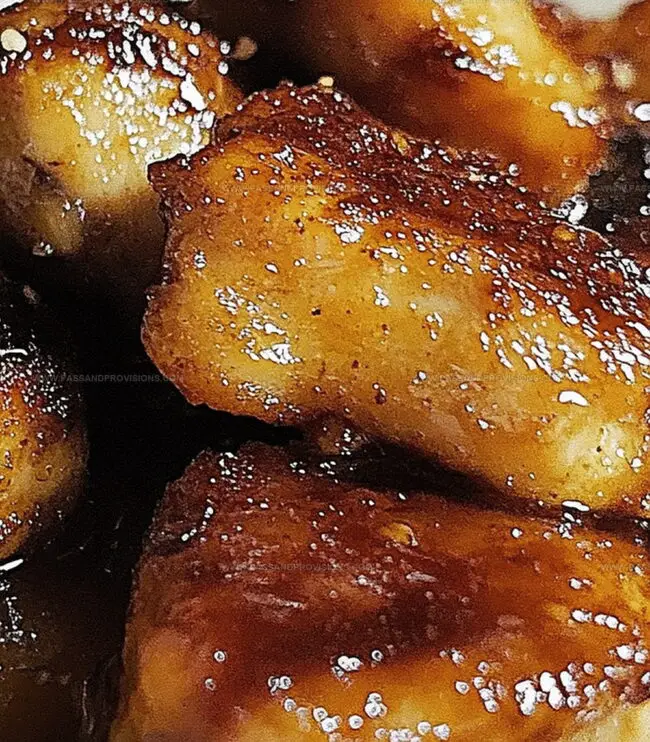
Golden-brown chicken pieces glazed in a sweet and savory sauce promise an unforgettable meal.
Fragrant garlic and rich honey form a mouthwatering partnership that elevates simple ingredients into something extraordinary.
Bold home cooks understand that perfect balance means blending contrasting tastes with confidence.
Restaurant-quality dishes are completely achievable in your own kitchen with minimal effort and maximum flavor.
Each crispy bite promises a delectable journey your taste buds will celebrate.
Prepare to experience a recipe that turns an ordinary evening into a memorable feast.
Why Crispy Honey Garlic Chicken Is a Standout
Must-Have Ingredients for Honey Garlic Chicken
Main Proteins:Coating Ingredients:Sauce and Seasoning Ingredients:Cooking and Garnish Ingredients:How to Make Crispy Chicken with Honey Garlic Sauce
Step 1: Prepare Chicken Coating
Combine flour and cornstarch in one bowl. Crack eggs into another bowl and whisk. Place panko in the third bowl. Pat chicken pieces dry with paper towels. Dunk each chicken piece first into flour mixture, then egg wash, and finally coat completely with panko breadcrumbs. Rest coated chicken on clean plate.
Step 2: Create Crispy Golden Exterior
Heat vegetable oil in large skillet until temperature reaches 350 degrees Fahrenheit. Carefully place chicken pieces into hot oil. Fry each batch until exterior turns golden brown and interior reaches safe cooking temperature. Rotate chicken occasionally for even cooking. Transfer finished pieces onto paper towel-lined plate to absorb excess oil.
Step 3: Craft Tangy Honey Garlic Glaze
In saucepan, combine:Simmer ingredients over medium heat. Whisk cornstarch with water to create smooth slurry. Pour slurry into sauce and continue stirring until mixture thickens slightly.
Step 4: Transform Chicken with Glorious Coating
Pour warm honey garlic sauce over crispy chicken pieces. Gently toss until every piece glistens with delicious sauce.
Step 5: Present Mouthwatering Masterpiece
Transfer coated chicken to serving platter. Sprinkle chopped green onions and sesame seeds on top. Serve immediately alongside steamed rice or fresh vegetables.
Key Tips for Crunchy Chicken Every Time
Reheating and Storing Crispy Chicken Properly
What Goes Well with Honey Garlic Chicken
Variations to Try for Honey Garlic Chicken Fans
Crispy Chicken FAQ Round-Up
You can substitute regular breadcrumbs, but panko creates a crispier, lighter coating that gives the chicken a superior crunch and texture.
Baking is possible but won’t achieve the same crispy exterior. If baking, coat chicken in oil, use a high temperature around 425F, and flip halfway to ensure even browning.
Use a meat thermometer to check the internal temperature reaches 165F at the thickest part. Golden brown color and clear juices are also good indicators of doneness.
You can replace rice vinegar with apple cider vinegar or white wine vinegar. These alternatives will provide similar tangy notes to the honey garlic sauce.
Print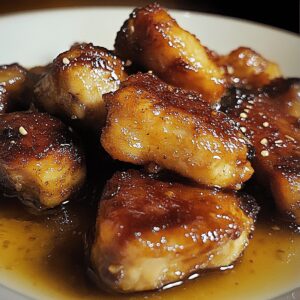
Crispy Honey Garlic Chicken Recipe
- Total Time: 35 minutes
- Yield: 4 1x
Description
Succulent Crispy Honey Garlic Chicken brings golden-brown perfection to your dinner table with irresistible flavors. Juicy chicken pieces glazed in sweet and savory sauce promise a restaurant-worthy meal you’ll crave again and again.
Ingredients
Chicken Ingredients:
- 1 pound (454 grams) boneless, skinless chicken thighs or breasts, cut into bite-sized pieces
- 1 cup panko breadcrumbs
- ½ cup all-purpose flour
- ¼ cup cornstarch
- 2 large eggs, beaten
- ½ teaspoon salt
- ¼ teaspoon black pepper
Coating and Frying Ingredients:
- Vegetable oil (for frying)
Sauce Ingredients:
- ¼ cup honey
- 2 tablespoons soy sauce
- 1 tablespoon rice vinegar (or apple cider vinegar)
- ¼ cup water
- 2 cloves garlic, minced
- 1 teaspoon cornstarch (mixed with 1 tablespoon water to make a slurry)
Garnish Ingredients:
- Chopped green onions
- Sesame seeds
Instructions
- Prepare the chicken pieces by generously seasoning with salt and pepper, ensuring even coverage for maximum flavor absorption.
- Create a three-stage coating system: combine flour and cornstarch in one vessel, whisk eggs in another, and place panko breadcrumbs in the third container.
- Methodically dredge each chicken piece through the flour mixture, ensuring complete coverage, then transfer to the egg wash, allowing excess to drip off before rolling in panko breadcrumbs.
- Heat vegetable oil in a deep skillet to precisely 350F, maintaining consistent temperature for optimal crispiness.
- Carefully lower breaded chicken into hot oil, working in small batches to prevent overcrowding and maintain oil temperature.
- Fry chicken pieces, rotating periodically, until they achieve a rich golden-brown exterior and reach safe internal temperature, approximately 4-5 minutes per batch.
- Remove fried chicken and drain on paper towels to eliminate excess oil, preserving the crispy texture.
- Craft the honey garlic sauce by combining honey, soy sauce, rice vinegar, and finely minced garlic in a saucepan over medium heat.
- Introduce a cornstarch slurry to the simmering sauce, stirring continuously until the mixture thickens and develops a glossy consistency.
- Transfer crispy chicken to a large mixing bowl and pour the warm honey garlic sauce over the pieces, gently tossing to ensure uniform coating.
- Plate the sauced chicken, garnishing with thinly sliced green onions and a sprinkle of sesame seeds for added visual appeal and texture.
- Serve immediately alongside steamed rice or vibrant stir-fried vegetables to complete the meal.
Notes
- Ensure chicken pieces are uniformly sized for even cooking and consistent crispiness.
- Pat chicken dry before seasoning to help the coating adhere better and create a crunchier exterior.
- Use a thermometer to maintain precise oil temperature, preventing soggy or burnt chicken.
- Customize the sauce’s sweetness and heat by adjusting honey and adding red pepper flakes for extra kick.
- Gluten-free option: Replace wheat flour with rice flour or gluten-free all-purpose flour blend.
- Baking alternative reduces oil usage – arrange breaded chicken on a wire rack and bake at 425F for 20-25 minutes, flipping halfway.
- For lighter version, use air fryer at 375F for 12-15 minutes, spraying chicken with minimal oil.
- Make ahead and reheat chicken in oven at 350F for 10 minutes to maintain crispiness.
- Extra sauce tip: Double the sauce recipe to have additional drizzling options at the table.
- Prep Time: 15 minutes
- Cook Time: 20 minutes
- Category: Dinner, Snacks
- Method: Frying
- Cuisine: Asian
Nutrition
- Serving Size: 4
- Calories: 500
- Sugar: 16 g
- Sodium: 400 mg
- Fat: 20 g
- Saturated Fat: 3 g
- Unsaturated Fat: 15 g
- Trans Fat: 0 g
- Carbohydrates: 60 g
- Fiber: 2 g
- Protein: 25 g
- Cholesterol: 150 mg
Jamie Granger
Recipe Developer & Food Writer
Expertise
Education
Culinary Institute of America
Jamie Granger turns ingredients into memories. With her recipes, she brings a fusion-forward flair to every creation.
Her dishes reflect the places she’s explored, the chefs she’s learned from, and the deep connection she has to food as a form of expression.
At Pass and Provision, Jamie develops recipes that balance flavor, health, and beauty, meals that don’t just satisfy your appetite but speak to your curiosity.