
Magical Banana Chocolate Dream Roll Recipe for Sweet Bliss
Whipping up a delectable banana chocolate dream roll sends taste buds on an incredible adventure.
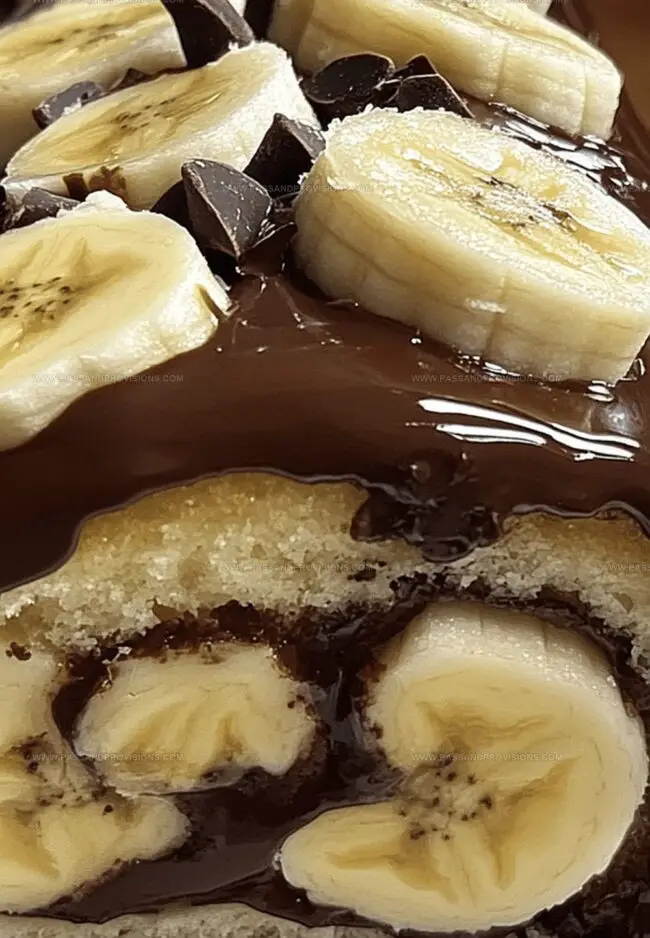
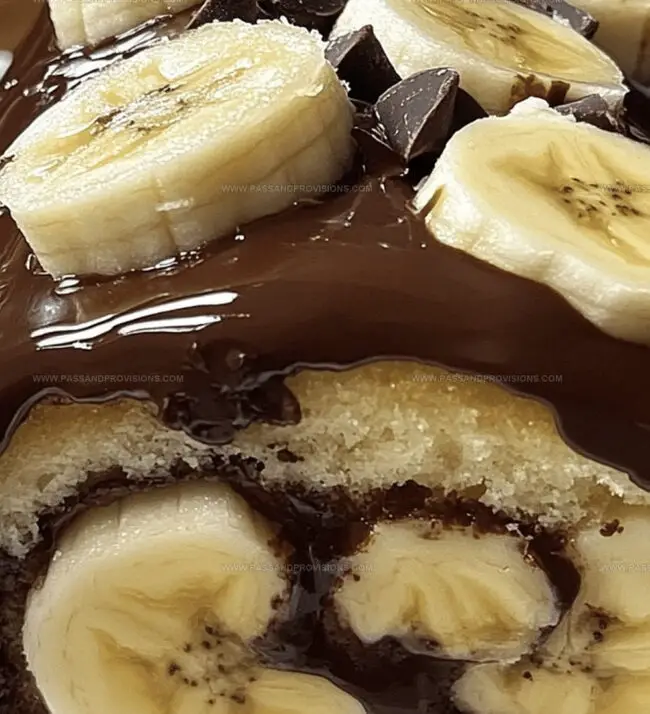
Soft bananas merge perfectly with rich chocolate in this irresistible dessert.
Sweet layers promise delightful surprises with every single bite.
Creamy textures and intense flavors create a magical experience you can craft at home.
This elegant treat looks complicated but comes together surprisingly easily.
Smooth chocolate and ripe banana dance across your palate in harmonious bliss.
Let’s unwrap this delicious journey and make something spectacular that will impress everyone around your table.
Why Banana Chocolate Dream Roll Feels Like a Hug in Cake Form
What Goes into a Banana Chocolate Dream Roll
Cake Base Ingredients:Filling Ingredients:Glaze Ingredients:Rolling Out Instructions for Banana Chocolate Dream Roll
Step 1: Whip Up the Chocolate Cake Base
Grab your mixing bowl and sift together flour, cocoa powder, baking powder, and salt. In another large bowl, beat eggs and sugar until they transform into a pale, fluffy mixture. Splash in vanilla extract for extra flavor. Gently fold dry ingredients and milk into the egg mixture, being careful not to overmix. Pour the batter into a greased jelly roll pan lined with parchment paper. Slide into a preheated oven and bake until the cake springs back with a light touch.
Step 2: Create the Magical Roll
Dust a clean kitchen towel with cocoa powder. While the cake is still warm, flip it onto the towel and remove the parchment paper. Starting from one short end, carefully roll the cake with the towel into a snug log. Let it cool completely.
Step 3: Craft the Creamy Banana Filling
Chill a mixing bowl and whip heavy cream with powdered sugar and vanilla until it forms stiff, dreamy peaks. Fold in mashed bananas until the mixture is smooth and delightful.
Step 4: Assemble the Delectable Roll
Gently unroll the cooled cake and spread the banana cream filling evenly, leaving a small border. Roll the cake back up without the towel, wrapping it tightly. Place seam-side down on a serving plate.
Step 5: Create the Chocolate Glaze
Melt chocolate chips and heavy cream together in a microwave or double boiler until silky smooth. Pour the glossy glaze over the cake roll, letting it cascade down the sides.
Step 6: Chill and Indulge
Refrigerate the cake roll for at least an hour to set the glaze. Slice and serve chilled, enjoying every decadent bite of your Banana Chocolate Dream Roll.
Pro Tips to Nail the Banana Chocolate Dream Roll
How to Store and Reheat Your Banana Chocolate Dream Roll
Sweet Pairings for the Dreamiest Banana Roll
Fun Twists to Try on the Banana Chocolate Dream Roll
All the FAQs You Might Ask About Banana Chocolate Dream Roll
Yes, simply substitute the regular flour with a gluten-free all-purpose flour blend. Ensure the blend contains xanthan gum for better texture and structure.
Choose very ripe bananas with dark brown spots. These are the sweetest and will provide the most intense banana flavor for your cream filling.
Don’t worry! If the cake develops small cracks, the chocolate glaze will help cover imperfections. Roll gently and use the towel as support to prevent major cracking.
Absolutely! You can make the entire roll up to 2 days ahead. Keep it covered in the refrigerator and add the chocolate glaze just before serving for the best presentation and flavor.
Print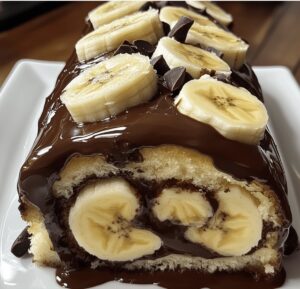
Banana Chocolate Dream Roll Recipe
- Total Time: 37 minutes
- Yield: 8 1x
Description
Sweet banana chocolate dream roll delivers a symphony of silky chocolate and ripe banana flavors in one elegant dessert. Rich layers of moist cake and creamy filling invite dessert enthusiasts to savor each delightful bite with pure culinary passion.
Ingredients
Cake Components:
- 4 large eggs
- ¾ cup (180 ml) granulated sugar
- ¾ cup (90 g) all-purpose flour
- ¼ cup (25 g) cocoa powder
- 1 teaspoon baking powder
- ¼ teaspoon salt
Liquid and Flavor Enhancers:
- ¼ cup (60 ml) milk
- 1 teaspoon vanilla extract
Cream Filling Components:
- 1 cup (240 ml) heavy whipping cream, cold
- ¼ cup (30 g) powdered sugar
- 2 ripe bananas, mashed
- 1 teaspoon vanilla extract
Chocolate Glaze:
- ½ cup (85 g) semi-sweet chocolate chips
- ¼ cup (60 ml) heavy cream
Instructions
- Craft the chocolate base by meticulously sifting flour, cocoa powder, baking powder, and salt into a pristine mixing vessel, setting it aside for future incorporation.
- Whisk eggs and granulated sugar in a spacious bowl until the mixture transforms into a pale, voluminous concoction, approximately 5 minutes, infusing vanilla extract for aromatic depth.
- Delicately introduce the dry ingredients to the egg mixture, alternating with milk, ensuring a gentle fold to maintain the batter’s airy texture without overmixing.
- Transfer the silky batter into a prepared jelly roll pan lined with parchment, spreading it uniformly before sliding into a preheated 350F (175C) oven.
- Bake for 10-12 minutes, monitoring until the cake surface springs back upon gentle touch, indicating perfect doneness.
- Immediately after removing from the oven, coax the warm cake onto a cocoa-dusted kitchen towel, carefully peeling away the parchment paper.
- Commence rolling the cake with the towel from a short end, creating a compact cylindrical shape, and allow it to cool completely, maintaining its rolled form.
- Whip heavy cream with powdered sugar and vanilla in a chilled bowl until stiff peaks emerge, symbolizing perfect consistency.
- Fold mashed bananas into the whipped cream, creating a luscious, fruit-infused filling with a smooth, integrated texture.
- Gently unroll the cooled cake, revealing its interior, and spread the banana cream evenly, leaving a modest border to prevent overflow.
- Re-roll the cake without the towel, ensuring a tight, elegant form, and position it seam-side down on a serving plate.
- Melt chocolate chips with heavy cream using a microwave or double boiler, stirring until achieving a glossy, seamless glaze.
- Cascade the chocolate glaze over the rolled cake, allowing it to elegantly drip down the sides, creating a tantalizing visual effect.
- Refrigerate the dessert for a minimum of one hour, enabling the glaze to set and flavors to harmonize before slicing and serving chilled.
Notes
- Prevent cake cracking by rolling the warm cake with a towel immediately after baking, which helps maintain flexibility and prevents breaking.
- Use ripe, spotty bananas for the filling to ensure maximum sweetness and intense banana flavor in the cream.
- Create a gluten-free version by substituting all-purpose flour with almond flour or a gluten-free baking blend, maintaining the same measurement.
- Enhance the chocolate glaze by adding a pinch of espresso powder or sea salt to intensify the chocolate’s depth and complexity.
- Prep Time: 25 minutes
- Cook Time: 12 minutes
- Category: Desserts, Snacks
- Method: Baking
- Cuisine: American
Nutrition
- Serving Size: 8
- Calories: 280
- Sugar: 22 g
- Sodium: 150 mg
- Fat: 16 g
- Saturated Fat: 9 g
- Unsaturated Fat: 5 g
- Trans Fat: 0 g
- Carbohydrates: 33 g
- Fiber: 1 g
- Protein: 4 g
- Cholesterol: 70 mg
Jamie Granger
Recipe Developer & Food Writer
Expertise
Education
Culinary Institute of America
Jamie Granger turns ingredients into memories. With her recipes, she brings a fusion-forward flair to every creation.
Her dishes reflect the places she’s explored, the chefs she’s learned from, and the deep connection she has to food as a form of expression.
At Pass and Provision, Jamie develops recipes that balance flavor, health, and beauty, meals that don’t just satisfy your appetite but speak to your curiosity.