
Decadent Rocky Road Candy Recipe: Sweet Sin in Every Bite
Chocolate lovers crave rich, decadent treats that meld sweetness with sinful rocky road candy in every heavenly bite.
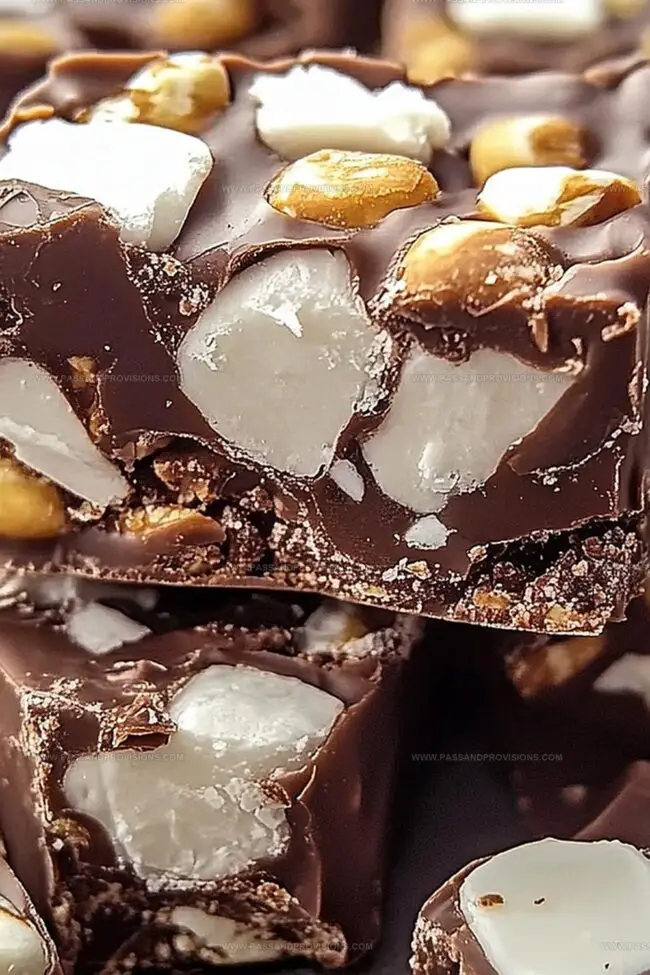
This classic confection blends marshmallows, nuts, and chocolate into an irresistible dessert.
Each morsel promises a delightful crunch and smooth texture that melts perfectly on your tongue.
The simple ingredients combine to create a nostalgic treat that sparks joy with every nibble.
Generations have savored this beloved candy, passing down recipes that bring smiles and comfort.
Not just a dessert, this rocky road candy represents pure indulgence.
You’ll want to share these delectable morsels with everyone around you.
Quick Recipe Overview
Rocky Road Candy Essentials You’ll Crave
For Chocolate Base:For Texture and Crunch:For Flavor Enhancement:Tools for Melting and Stirring With Ease
How to Mix Up Your Own Rocky Road Treat

Grab your microwave-safe bowl and transform chocolate chips into a silky river of deliciousness. Zap in short bursts, stirring between each interval until the mixture looks glossy and smooth. Pro tip: If you’re feeling fancy, a double boiler works wonderfully too.
Whisper in vanilla and a pinch of salt, awakening the chocolate’s hidden depths. Gently tumble marshmallows and almonds into the chocolate landscape, ensuring each morsel gets a luxurious chocolate hug.
Dress your baking dish in parchment paper like a culinary runway. Pour the decadent mixture, spreading it with loving care to create an even, tempting surface.
Tuck your creation into the refrigerator’s cool embrace. Let chemistry work its magic for 1-2 hours until the candy becomes delightfully firm and irresistible.
Slice into perfect squares or break into rustic chunks. Your rocky road candy is ready to dazzle taste buds and spark joy in every bite.
Nut and Chocolate Swaps That Work Well
Serve This Candy for Parties or Gifts
Storage Tips to Prevent Stickiness or Crumbling
Print
Sinful Rocky Road Candy Recipe
- Total Time: 1 hour 10 minutes
- Yield: 13 1x
Description
Sweet rocky road candy delivers a chocolate lover’s dream with marshmallow and nut crunch. Creamy chocolate blends perfectly with chewy marshmallows and crunchy almonds, creating pure indulgence you can’t resist.
Ingredients
- 2 cups (473 ml) semi-sweet chocolate chips or chopped chocolate
- 2 cups (240 g) mini marshmallows
- 1 cup (142 g) roasted almonds (or walnuts, pecans)
- 1 tbsp (14 g) butter or coconut oil
- ½ tsp (2.5 ml) vanilla extract
- ¼ tsp (1.25 ml) salt
Instructions
- Chocolate Fusion: Melt chocolate chips and butter in a microwave-safe bowl using 30-second intervals, stirring until achieving a glossy, uniform consistency. For precision, utilize a double boiler method if preferred.
- Flavor Enhancement: Incorporate vanilla extract and salt into the melted chocolate mixture, creating a rich base. Gently fold marshmallows and almonds throughout the chocolate, ensuring complete and even coverage for a balanced texture.
- Structural Preparation: Prepare an 8-inch baking dish by lining with parchment paper, creating a smooth surface. Transfer the chocolate mixture, spreading carefully to establish an even layer that captures all ingredients uniformly.
- Solidification Process: Place the prepared candy in the refrigerator for 1-2 hours, allowing complete setting and achieving a firm, structured consistency. The cooling period enables ingredients to bind and develop a satisfying texture.
- Serving Transformation: Once thoroughly chilled, liberate the candy from the dish by lifting the parchment paper. Slice into precise square portions or break into rustic, irregular chunks, presenting a visually appealing and delectable treat ready for immediate enjoyment.
Notes
- Melt chocolate slowly and stir frequently to avoid scorching, ensuring smooth and glossy texture.
- Keep chocolate at medium-low heat and remove from heat source immediately when fully melted to maintain perfect spreadability.
- Swap almonds with pecans, walnuts, or add dried fruit like cranberries for personalized flavor and nutritional variety.
- Store Rocky Road Candy in an airtight container between parchment layers in refrigerator for up to one week, preventing candies from sticking together.
- Prep Time: 10 minutes
- Cook Time: 1 hour
- Category: Desserts, Snacks
- Method: Blending
- Cuisine: American
Nutrition
- Serving Size: 13
- Calories: 150
- Sugar: 12 g
- Sodium: 50 mg
- Fat: 8 g
- Saturated Fat: 5 g
- Unsaturated Fat: 3 g
- Trans Fat: 0 g
- Carbohydrates: 18 g
- Fiber: 1 g
- Protein: 2 g
- Cholesterol: 10 mg
William Hawkins
Founder & Culinary Director
Expertise
Education
Sullivan University, Louisville, KY
William Hawkins isn’t just a chef, he’s a storyteller through food. From his hometown of Louisville, KY, he’s spent years refining his craft, turning local ingredients into something extraordinary.
With classical training from Sullivan University and a career marked by innovation, mentorship, and Southern soul, William approaches every recipe with purpose. His kitchen is where old techniques meet fresh ideas, and where comfort food gets a thoughtful, modern twist.
When he’s not building dishes from the ground up, he’s out gathering inspiration from nature, markets, and the stories people share around the table.