Dreamy Silky Coffee Tiramisu Cake Recipe: Sweet Heaven in Layers
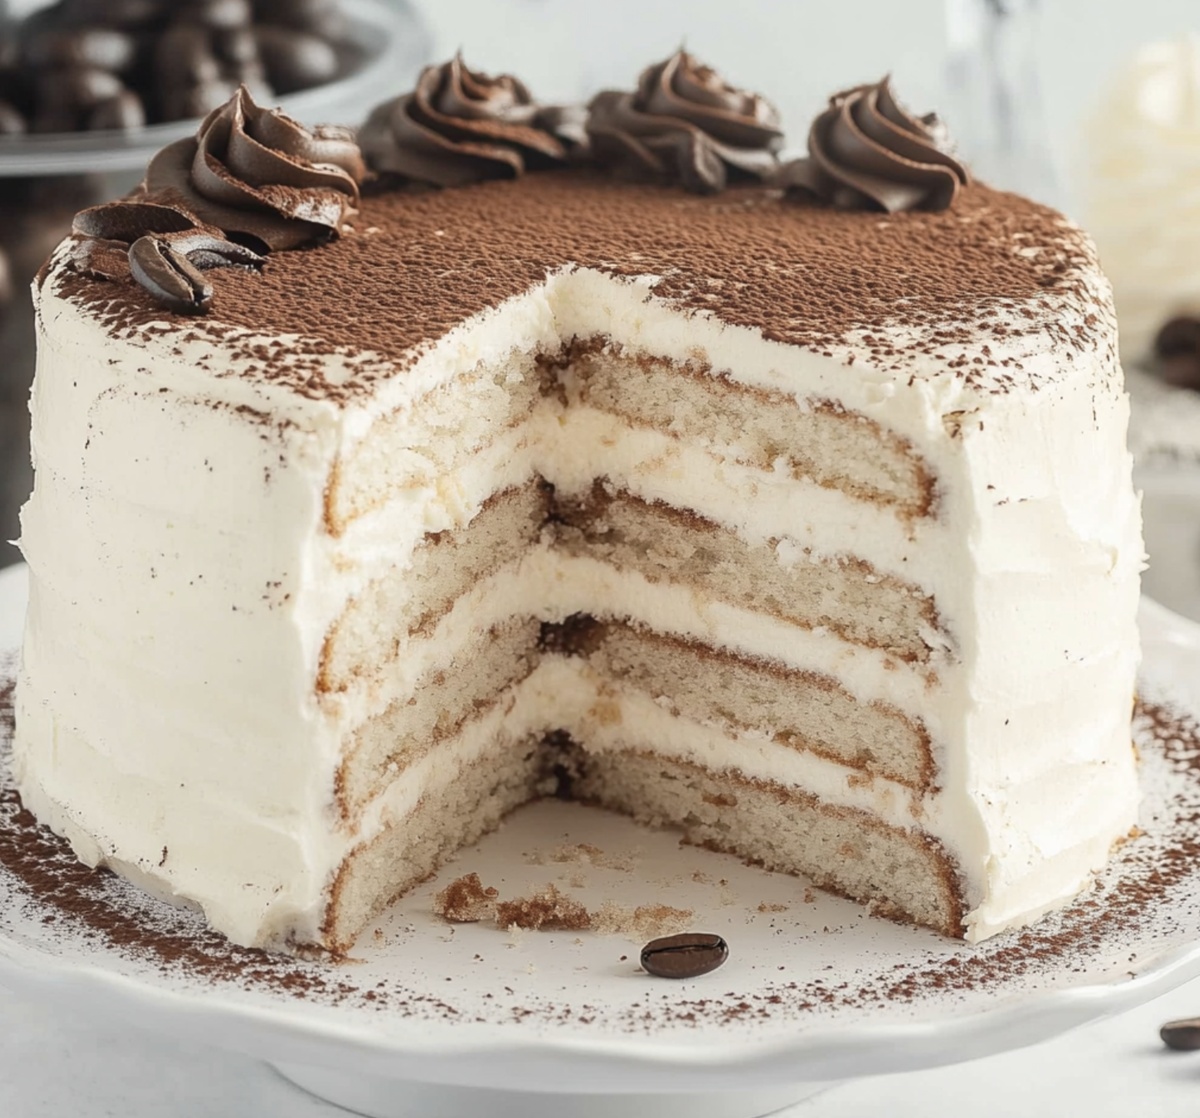
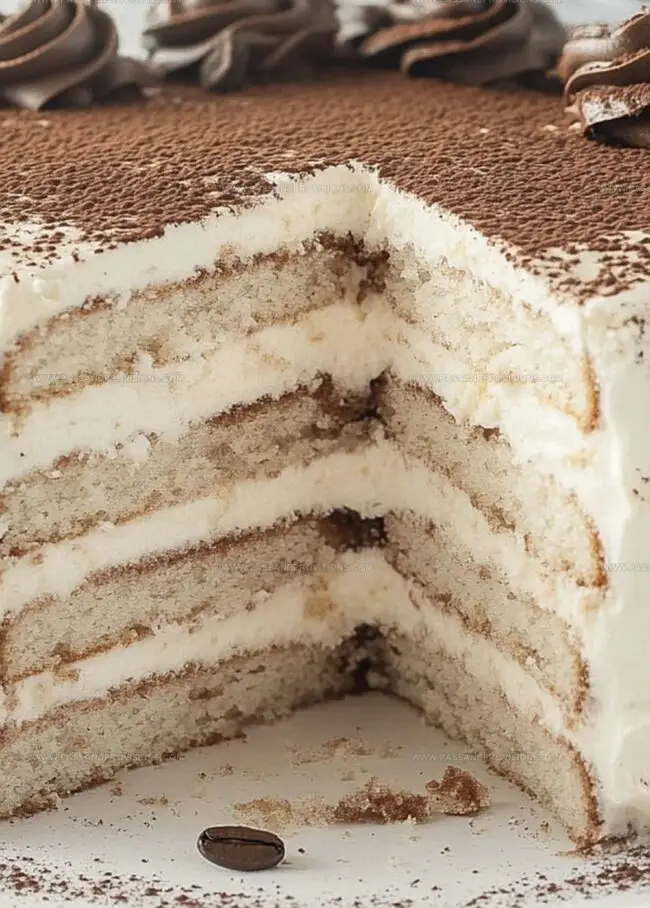
Indulgence reaches new heights with this dreamy coffee tiramisu cake that dances between rich espresso and velvety mascarpone.
Classic Italian desserts rarely showcase such exquisite balance of flavors.
Layers of delicate sponge cake soak up intense coffee essence, creating a harmonious blend of sweetness and depth.
Each forkful promises a luxurious journey through creamy textures and bold coffee notes.
The recipe transforms simple ingredients into an elegant masterpiece that whispers sophisticated comfort.
Prepare to transport your taste buds to the charming cafes of Italy with this decadent dessert.
You’ll fall in love with every smooth, coffee-infused bite.
Quick Recipe Overview
Coffee Tiramisu Cake Ingredient Guide
For Cake Base:For Coffee Soaking Liquid:For Cream Filling:Must-Have Tools for Coffee Tiramisu Cake
How to Layer a Stunning Coffee Tiramisu Cake

Warm up your oven to a cozy 350°F and lovingly coat two round cake pans with butter and parchment paper.
Whisk flour, baking powder, and salt together in a medium bowl until perfectly blended.
Beat butter and sugar in a separate bowl until the mixture becomes light, fluffy, and cloud-like.
Gently add eggs one by one, stirring thoroughly after each addition. Splash in vanilla extract for a delightful aroma.
Slowly fold dry ingredients into the creamy mixture, alternating with milk. Mix until just combined, avoiding overmixing.
Pour batter evenly into prepared pans and slide into the preheated oven. Bake for 20-25 minutes until a toothpick comes out clean.
Allow cakes to rest in pans for 10 minutes, then transfer to a wire rack for complete cooling.
Tips to Intensify Coffee Tiramisu Cake Flavor
Serving Coffee Tiramisu Cake Like a Star
Keeping Coffee Tiramisu Cake Creamy and Chilled
Print
Silky Coffee Tiramisu Cake Recipe
- Total Time: 45 minutes
- Yield: 13 1x
Description
Creamy coffee tiramisu cake blends Italian dessert traditions with rich espresso-soaked layers. Mascarpone cheese and delicate ladyfingers create a luxurious dessert you’ll savor with pure delight.
Ingredients
- 3 large eggs
- 1 ½ cups (375 ml) all-purpose flour
- 2 teaspoons baking powder
- ½ teaspoon salt
- 1 cup (200 g) granulated sugar
- ¾ cup (170 g) unsalted butter (softened)
- ½ cup (120 ml) whole milk
- 8 oz (226 g) mascarpone cheese (softened)
- 1 cup (240 ml) heavy whipping cream
- ½ cup (60 g) powdered sugar
- 1 tbsp sugar
- ½ cup (120 ml) strong brewed coffee or espresso (cooled)
- 2 tbsps coffee liqueur (optional, like Kahlua or Tia Maria)
- 1 tsp vanilla extract
- 1 tbsp unsweetened cocoa powder (for dusting)
- Dark chocolate shavings (optional)
Instructions
- Oven Preparation: Set the oven to 350F (175C) and line two 8-inch round cake pans with parchment paper, lightly greasing the surfaces to prevent sticking.
- Dry Ingredient Fusion: Whisk flour, baking powder, and salt in a medium bowl until uniformly blended, creating a light and airy dry mixture.
- Butter-Sugar Transformation: Using an electric mixer, cream butter and sugar until the mixture becomes pale, fluffy, and develops a silky consistency.
- Egg and Flavor Integration: Blend eggs into the butter-sugar base one at a time, ensuring complete incorporation, then gently fold in vanilla extract to enhance the overall flavor profile.
- Batter Composition: Delicately alternate folding dry ingredients and milk into the wet mixture, maintaining a smooth texture and avoiding overmixing to preserve the cake’s delicate structure.
- Pan Distribution and Baking: Evenly spread the batter across prepared pans, creating balanced layers, and bake for 20-25 minutes until a toothpick inserted in the center emerges clean.
- Cooling and Stabilization: Allow cakes to rest in pans for 10 minutes, then transfer to a wire rack to cool completely, ensuring the cake’s structural integrity and optimal texture.
Notes
- Prevent Overmixing: Gently fold dry ingredients into wet mixture to maintain cake’s light, airy texture and avoid dense, tough results.
- Temperature Control: Use room temperature ingredients, especially eggs and butter, to ensure smooth batter and even cake rise.
- Moisture Balance: Check cake doneness precisely with toothpick test to prevent dry or undercooked sections.
- Pan Preparation: Properly line cake pans with parchment paper and grease lightly to guarantee easy cake removal without sticking.
- Prep Time: 15 minutes
- Cook Time: 30 minutes
- Category: Desserts, Drinks
- Method: Baking
- Cuisine: Italian
Nutrition
- Serving Size: 13
- Calories: 363
- Sugar: 29 g
- Sodium: 143 mg
- Fat: 22 g
- Saturated Fat: 13 g
- Unsaturated Fat: 9 g
- Trans Fat: 1 g
- Carbohydrates: 34 g
- Fiber: 1 g
- Protein: 5 g
- Cholesterol: 82 mg
William Hawkins
Founder & Culinary Director
Expertise
Education
Sullivan University, Louisville, KY
William Hawkins isn’t just a chef, he’s a storyteller through food. From his hometown of Louisville, KY, he’s spent years refining his craft, turning local ingredients into something extraordinary.
With classical training from Sullivan University and a career marked by innovation, mentorship, and Southern soul, William approaches every recipe with purpose. His kitchen is where old techniques meet fresh ideas, and where comfort food gets a thoughtful, modern twist.
When he’s not building dishes from the ground up, he’s out gathering inspiration from nature, markets, and the stories people share around the table.