Dreamy Bliss: The Magical Russian Honey Cake Recipe
Sweet layers of delicate cake melt perfectly in this authentic Russian honey cake that captures childhood memories.
Golden honey weaves its magic through each tender crumb, creating an irresistible dessert.
Soft and delicate, the cake balances rich sweetness with subtle warmth.
Traditional Russian baking techniques shine in this incredible recipe that connects generations.
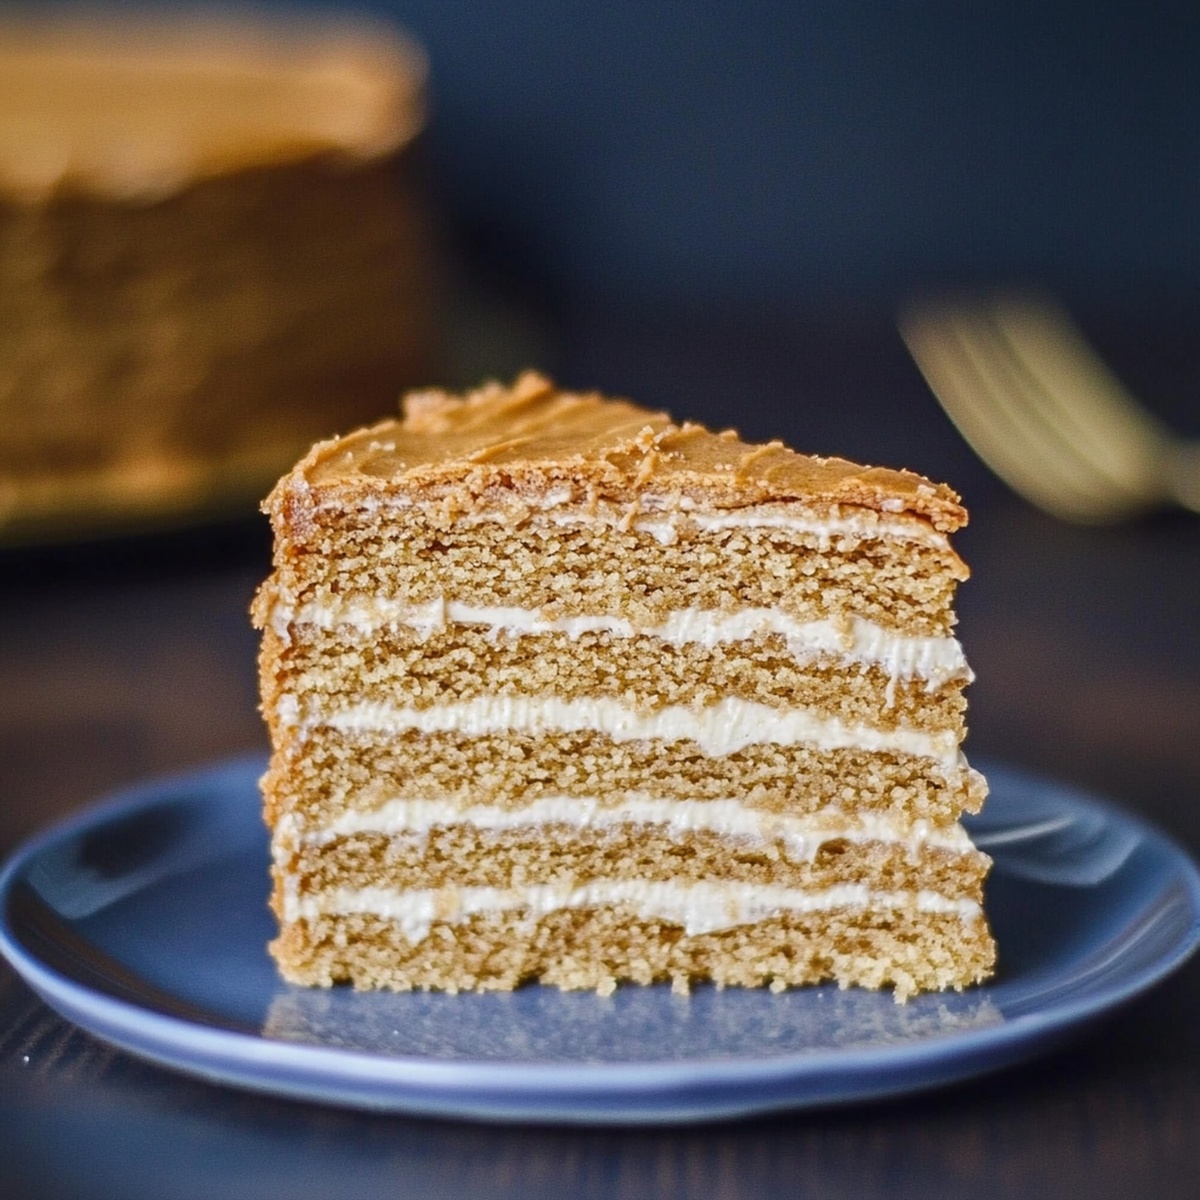
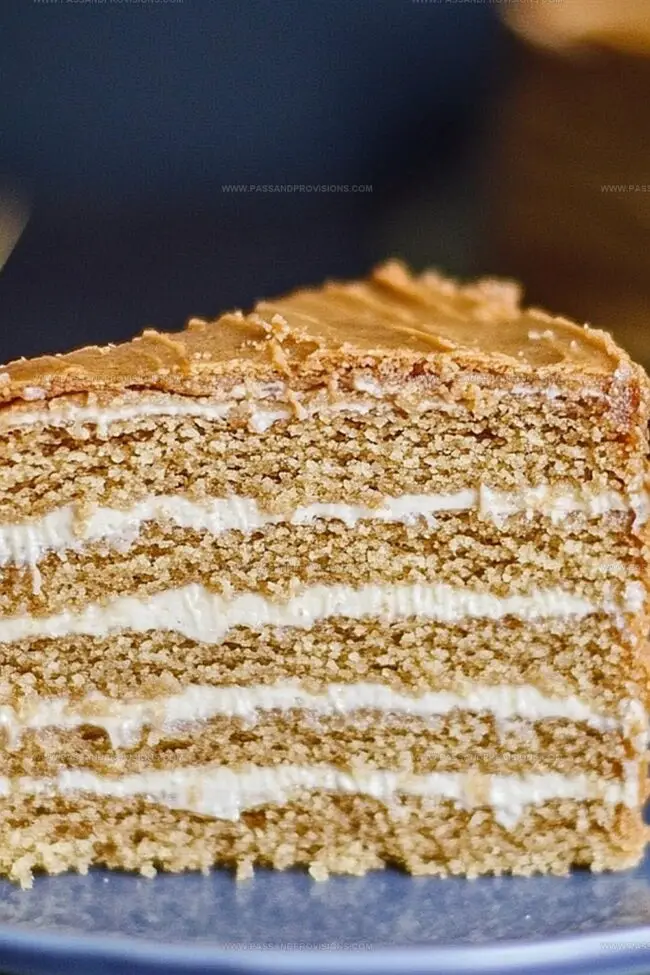
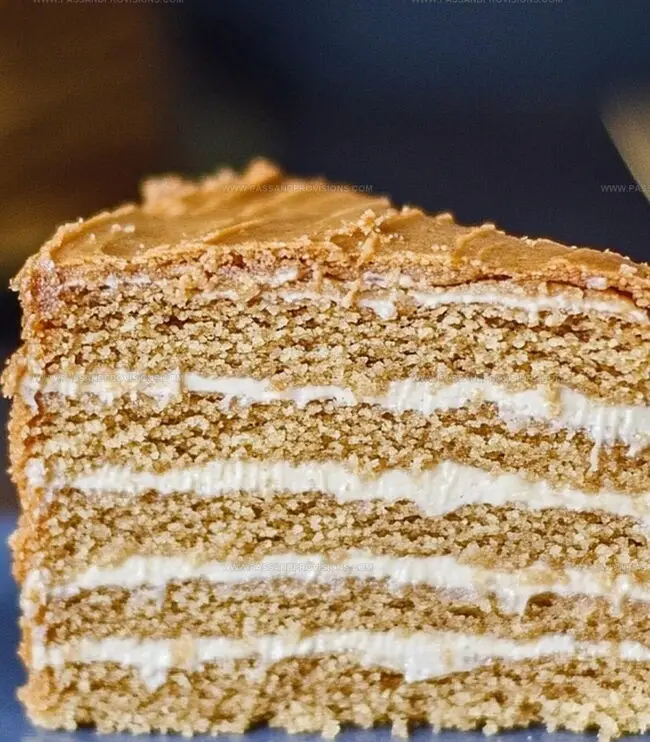
Crisp layers stack elegantly, promising a delightful texture in every bite.
Each slice tells a story of comfort and love from Eastern European kitchens.
Prepare to savor a dessert that will transport you straight to the heart of Russia’s culinary traditions.
Quick Recipe Overview
Russian Honey Cake Essentials You’ll Need
For Cake Layers:For Cream Filling:For Decoration:Equipment for Building a Russian Honey Cake
How to Craft a Layered Russian Honey Cake
Combine butter, sugar, and honey in a saucepan over medium heat. Stir until smooth and fully blended.
Remove from heat and quickly blend eggs into the mixture, ensuring they don’t scramble.
Add baking soda to create a frothy texture. Mix thoroughly.
Fold in flour gradually to create a soft, sticky dough. Divide into several equal balls.
Roll each dough ball into thin, uniform circles. Bake at 350F for 5-7 minutes until golden and crisp.
While warm, cut layers into perfect circles using a plate as a guide. Save trimmings for decoration.
Beat heavy cream until stiff. Gently fold in sour cream, powdered sugar, and vanilla for a silky smooth cream.
Layer each delicate honey disc with cream, stacking carefully. Cover entire cake with remaining cream.
Crush saved cake trimmings and sprinkle over the cake. Optional: Garnish with fresh berries.
Refrigerate for at least 6 hours, allowing flavors to blend and layers to soften beautifully.
Russian Honey Cake: Flavor Variations and Tips
Plating That Russian Honey Cake Like It’s Bakery-Ready
Keeping Russian Honey Cake Fresh After Day One
Print
Heavenly Russian Honey Cake Recipe
- Total Time: 1 hour 10 minutes
- Yield: 9 1x
Description
Layers of delicate Russian honey cake dance with golden sweetness, blending rich caramel notes and light sponge textures. Delightful crumbs melt on your palate, inviting pure culinary joy from this beloved Eastern European dessert.
Ingredients
- 180 g (½ cup) honey
- 115 g (½ cup) unsalted butter
- 2 large eggs
- 100 g (½ cup) granulated sugar
- 1 tsp vanilla extract
- 1 tsp baking soda
- 360 g (3 cups) all-purpose flour
- 600 g (2 ½ cups) sour cream (full fat)
- 400 g (1 ¾ cups) heavy whipping cream
- 100 g (½ cup) powdered sugar
- 1 tsp vanilla extract
- Crumbled cake scraps
- Honey drizzle (optional)
- Fresh berries or mint leaves (optional)
Instructions
- Prepare Honey Base: In a saucepan, melt butter, sugar, and honey over medium heat until smooth and fully combined.
- Create Dough Mixture: Remove from heat, rapidly whisk in eggs, then incorporate baking soda until frothy. Gradually fold in flour to form a soft, sticky dough.
- Layer Preparation: Divide dough into 8-10 equal portions. Roll each into a ball, then carefully flatten each into thin, uniform circles on parchment-lined baking sheets.
- Baking Process: Preheat oven to 350F (175C). Bake each layer for 5-7 minutes until golden and crisp. Immediately trim edges while warm using a plate as a guide, reserving scraps for later decoration.
- Cream Filling Creation: Whip heavy cream until stiff peaks form. Gently fold in sour cream, powdered sugar, and vanilla extract until smooth and creamy.
- Cake Assembly: Layer each cake disc with cream filling, stacking carefully and evenly. Completely cover the entire cake with remaining cream, ensuring smooth surface.
- Final Touches: Crush reserved cake scraps and delicately sprinkle over cake’s top and sides. Optional: Add fresh berries for enhanced presentation.
- Chill and Develop: Refrigerate cake for minimum 6 hours or overnight, allowing flavors to meld and cake layers to soften and absorb cream.
Notes
- Heat honey gently to prevent burning and maintain its delicate flavor profile, ensuring smooth incorporation into the dough.
- Watch layers closely during baking; thin layers can quickly turn from golden to burnt, requiring precise 5-7 minute timing.
- Keep dough balls covered to prevent drying out, using plastic wrap between rolling and baking to maintain moisture.
- Extended refrigeration is crucial; overnight resting allows layers to absorb cream, creating signature soft, tender texture characteristic of Russian Honey Cake.
- Prep Time: 30 minutes
- Cook Time: 40 minutes
- Category: Desserts
- Method: Baking
- Cuisine: Russian
Nutrition
- Serving Size: 9
- Calories: 300
- Sugar: 20g
- Sodium: 150mg
- Fat: 15g
- Saturated Fat: 9g
- Unsaturated Fat: 4g
- Trans Fat: 0g
- Carbohydrates: 38g
- Fiber: 1g
- Protein: 5g
- Cholesterol: 60mg
William Hawkins
Founder & Culinary Director
Expertise
Education
Sullivan University, Louisville, KY
William Hawkins isn’t just a chef, he’s a storyteller through food. From his hometown of Louisville, KY, he’s spent years refining his craft, turning local ingredients into something extraordinary.
With classical training from Sullivan University and a career marked by innovation, mentorship, and Southern soul, William approaches every recipe with purpose. His kitchen is where old techniques meet fresh ideas, and where comfort food gets a thoughtful, modern twist.
When he’s not building dishes from the ground up, he’s out gathering inspiration from nature, markets, and the stories people share around the table.