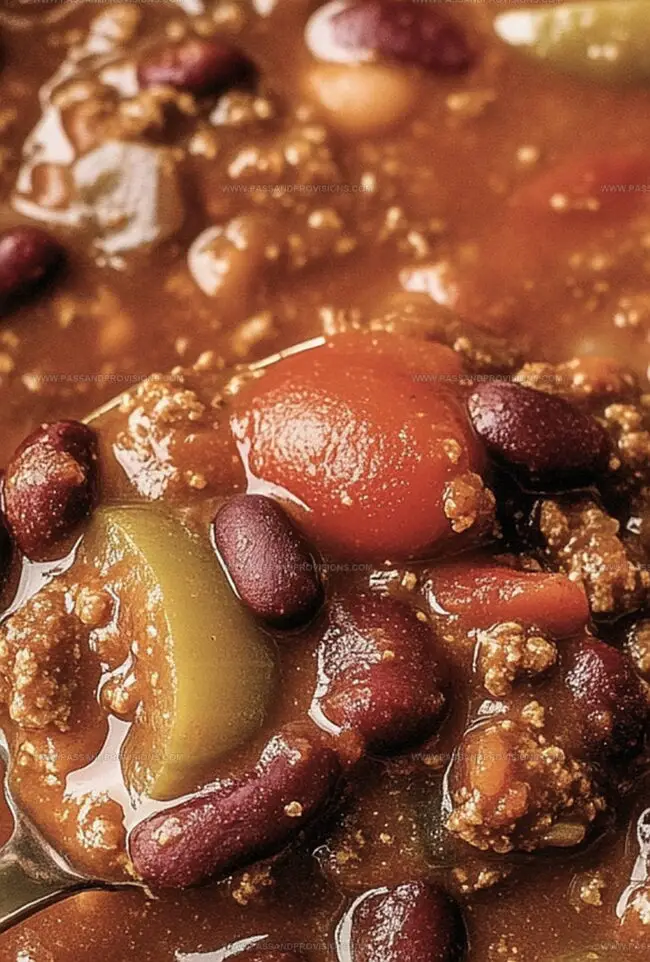
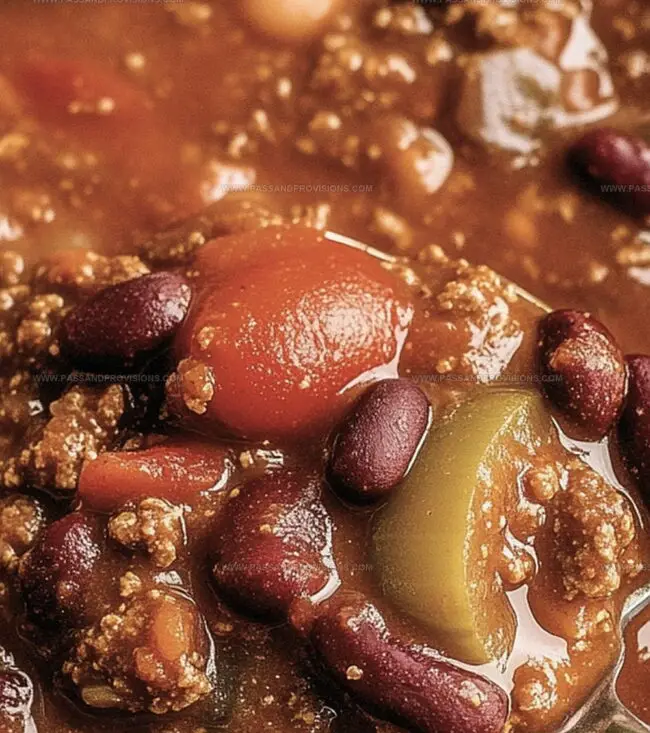
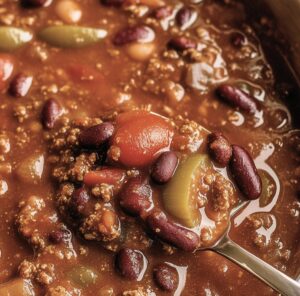
Warm, hearty chili elevates comfort food to new heights on chilly evenings.
Packed with robust flavors and rich ingredients, this recipe brings soul-warming goodness to your dinner table.
Tender ground beef mingles with aromatic spices, creating a symphony of taste that dances across your palate.
Beans, tomatoes, and a carefully crafted blend of seasonings transform an ordinary meal into an extraordinary culinary experience.
Each spoonful promises deep, satisfying warmth that wraps you in culinary comfort.
Perfectly balanced and incredibly delicious, this chili stands ready to become your new favorite go-to meal.
You’ll want to ladle this goodness into bowls and savor every delectable bite.
Quick Recipe Overview
Prep Time: 10 minutes
Cook Time: 40 minutes
Total Time: 50 minutes
Calories: 320 kcal
Servings: 6
Homemade Chili Ingredient Essentials
For Protein and Base:
Ground Beef: Rich, hearty meat that provides the foundation of classic chili, best when choosing lean cuts with 80/20 fat content for optimal flavor and texture.
Olive Oil: Helps brown the meat evenly and prevents sticking, selecting extra virgin ensures a cleaner, more robust cooking base.
For Aromatic Vegetables:
Onions: Adds deep, sweet undertones that build complex flavor profiles, choose yellow onions for traditional chili richness.
Garlic: Brings intense, pungent notes that elevate the entire dish’s depth, fresh cloves provide more vibrant taste compared to pre-minced varieties.
For Liquid and Seasoning:
Beef Broth or Water: Creates necessary moisture and helps develop a smooth, cohesive chili consistency, low-sodium options allow better control of overall saltiness.
Tools to Simmer the Perfect Homemade Chili
Large Pot or Dutch Oven: Essential for cooking ground beef and simmering chili with deep, even heat.
Wooden Spoon or Spatula: Perfect for stirring meat and breaking it into small pieces while cooking.
Cutting Board: Provides clean surface for chopping onions and preparing ingredients.
Chef’s Knife: Sharp blade for precisely dicing onions and mincing garlic.
Colander or Strainer: Helps drain excess grease from browned ground beef.
Measuring Cups: Useful for accurately portioning ingredients.
Directions for Cooking Homemade Chili Like a Pro
Fire Up the Flavor Base Warm your trusty large pot or Dutch oven on medium heat, creating the perfect stage for a mouthwatering chili adventure.
Brown the Beef Toss in your ground beef, letting it sizzle and dance until it transforms into a gorgeous golden-brown masterpiece. If things look a bit dry, splash in some olive oil for extra richness.
Unleash Aromatic Magic Introduce chopped onions and minced garlic, stirring them into the beef and letting their incredible fragrance fill your kitchen. Let them mingle and soften for a quick 2-3 minutes, releasing their deep, savory essence.
Build Complex Layers Sprinkle in your favorite chili spices – think cumin, chili powder, and a hint of paprika – allowing each spice to wake up and intensify the flavor profile.
Create Liquid Harmony Pour in crushed tomatoes and beef broth, creating a rich, robust base that will simmer and develop incredible depth.
Let the Magic Simmer Reduce heat and let your chili bubble gently, stirring occasionally. This slow cooking allows flavors to marry and intensify, transforming simple ingredients into a knockout meal.
Final Touch Taste and adjust seasonings, then serve your masterpiece hot, topped with your favorite garnishes like cheese, sour cream, or fresh cilantro.
Ways to Customize Homemade Chili Your Style
Make-Ahead Magic: Chili tastes even better the next day, so prepare it in advance and let flavors meld overnight in the refrigerator for a more intense taste experience.
Meat Mix-Up: Swap ground beef with ground turkey, chicken, or plant-based crumbles for a leaner or vegetarian version that still packs incredible flavor.
Spice Control: Adjust heat levels by adding more or less chili powder, cayenne pepper, or include diced jalapeños for those who love extra kick.
Texture Tricks: For a thicker chili, let it simmer uncovered to reduce liquid or add a tablespoon of cornmeal to naturally thicken the consistency without changing the taste.
Garnish Galore: Top your chili with shredded cheese, sour cream, fresh cilantro, diced green onions, or crushed tortilla chips to add different textures and layers of flavor.
Serving Homemade Chili to Impress
Cozy Comfort Bowl: Serve this hearty chili in deep ceramic bowls with a warm slice of cornbread on the side for soaking up every delicious spoonful.
Toppings Fiesta: Offer a colorful spread of garnishes like shredded cheddar cheese, sour cream, chopped green onions, and crispy tortilla strips so everyone can customize their bowl.
Game Day Champion: Present the chili in a large communal pot during sports gatherings, letting friends and family help themselves with ladles and small bowls for a casual, interactive dining experience.
Leftover Magic: Store extra chili in airtight containers for quick lunches or freeze in portion-sized containers for easy weeknight meals that taste even better the next day.
Keep Homemade Chili Fresh with These Storage Tips
Quick Refrigeration: Store chili in airtight containers and cool completely before sealing. Keeps fresh for 3-4 days in the refrigerator, ensuring maximum flavor retention.
Freezer-Friendly Batches: Portion chili into freezer-safe containers or heavy-duty zip-lock bags. Freeze up to 3 months for convenient future meals. Thaw overnight in the refrigerator before reheating.
Smart Reheating Technique: Warm chili slowly on stovetop over medium-low heat, stirring occasionally. Add a splash of broth or water to restore moisture and prevent scorching. Microwave works well for smaller portions, stirring midway through heating.
Flavor Enhancement Strategy: Chili often tastes better the next day as ingredients meld together. Allow flavors to develop by storing in refrigerator for 24 hours before serving. Taste and adjust seasonings if needed when reheating.
Hearty homemade chili brings comfort and warmth to dinner tables across America. Rich spices and tender meat create a soul-satisfying meal that you will crave on cool evenings.
Ingredients
Scale
1 lb ground beef
1 lb ground turkey (optional)
1 (15 oz) can kidney beans (drained & rinsed)
1 (15 oz) can black beans or pinto beans (drained & rinsed)
1 (15 oz) can diced tomatoes
1 (15 oz) can tomato sauce
1 cup beef broth or water
½ cup onion (diced)
3 cloves garlic (minced)
1 tbsp olive oil
2 tbsps tomato paste
1 tbsp Worcestershire sauce
1 tbsp apple cider vinegar or lime juice
1 tbsp chili powder
1 tsp cumin
½ tsp smoked paprika
½ tsp oregano
½ tsp black pepper
½ tsp salt
¼ tsp cayenne pepper (optional)
Shredded cheddar cheese
Sour cream or Greek yogurt
Diced avocado
Fresh cilantro or green onions
Crushed tortilla chips or cornbread
Instructions
Sear Protein: Heat a heavy-bottomed skillet on medium-high, add ground beef, and cook until deeply browned, systematically crumbling with a wooden spatula while rendering excess fat.
Develop Aromatics: Without cleaning the pan, introduce diced onions and minced garlic, stirring continuously to capture the residual beef flavor and create a robust flavor foundation.
Layer Spices: Sprinkle chili powder, cumin, and smoked paprika directly into the meat mixture, toasting briefly to amplify their complex, intense characteristics and distribute evenly.
Build Liquid Base: Pour in crushed tomatoes, kidney beans, and beef broth, stirring comprehensively to integrate all components and establish a rich, harmonious consistency.
Simmer and Concentrate: Reduce heat to low, cover the pot, and allow the chili to gently simmer for approximately 45-50 minutes, permitting flavors to meld and intensify while occasionally stirring to prevent scorching.
Finalize and Season: Taste and adjust seasoning with salt, black pepper, and optional hot sauce, ensuring a balanced and deeply satisfying flavor profile before serving hot.
Notes
Meat Selection Matters: Choose ground beef with 80/20 fat content for optimal flavor and juiciness, ensuring the chili doesn’t become too greasy or dry.
Drain Fat Strategically: Tilt the pan and use a spoon to remove excess fat, but leave a small amount for rich flavor and moisture retention.
Spice Layering Technique: Toast dry spices briefly before adding liquids to enhance their depth and release complex flavor profiles more effectively.
Simmer for Depth: Allow the chili to slow-cook on low heat for at least 1-2 hours, letting ingredients meld together and develop a more robust, harmonious taste.
Focus: Focused on mastering culinary methods and food science, immersive externships, hands‑on training in industry‑standard kitchen labs, and equipping graduates for roles in restaurant operations.
William Hawkins isn’t just a chef, he’s a storyteller through food. From his hometown of Louisville, KY, he’s spent years refining his craft, turning local ingredients into something extraordinary.
With classical training from Sullivan University and a career marked by innovation, mentorship, and Southern soul, William approaches every recipe with purpose. His kitchen is where old techniques meet fresh ideas, and where comfort food gets a thoughtful, modern twist.
When he’s not building dishes from the ground up, he’s out gathering inspiration from nature, markets, and the stories people share around the table.

William Hawkins
Founder & Culinary Director
Expertise
Education
Sullivan University, Louisville, KY
William Hawkins isn’t just a chef, he’s a storyteller through food. From his hometown of Louisville, KY, he’s spent years refining his craft, turning local ingredients into something extraordinary.
With classical training from Sullivan University and a career marked by innovation, mentorship, and Southern soul, William approaches every recipe with purpose. His kitchen is where old techniques meet fresh ideas, and where comfort food gets a thoughtful, modern twist.
When he’s not building dishes from the ground up, he’s out gathering inspiration from nature, markets, and the stories people share around the table.