Description
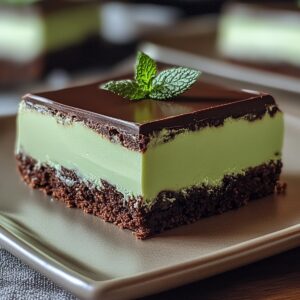
Cool mint chocolate slice delivers a refreshing twist on classic desserts. Chocolate lovers can savor this chilled treat’s creamy layers and rich mint flavor without turning on an oven.
Ingredients
Scale
- 2 cups (200 g) chocolate biscuits, crushed (Oreos or graham crackers)
- ½ cup (115 g) unsalted butter, melted
- 2 tbsps cocoa powder
- 2 cups (250 g) powdered sugar
- ¼ cup (60 g) unsalted butter, softened
- 2 tbsps milk
- 1 tsp peppermint extract
- Few drops green food coloring (optional)
- 1 ½ cups (270 g) dark or milk chocolate chips
- 2 tbsps butter or coconut oil (for glossy finish)
Instructions
- Base Creation: Pulverize biscuits with cocoa, blending seamlessly with melted butter to craft a cohesive, textured foundation that will anchor the dessert’s structure.
- Pan Preparation: Firmly compress the crumbly mixture into a lined pan, creating an even, compact base layer that will provide stability for subsequent layers.
- Mint Filling Development: Whisk cream cheese until velvety smooth, gradually integrating powdered sugar and peppermint extract to develop a luxurious, aromatic filling with impeccable consistency.
- Texture Enhancement: Incorporate softened butter into the mint mixture, elevating the filling’s richness and generating a silken, indulgent mouthfeel.
- Layer Assembly: Meticulously spread the mint filling across the chilled base, ensuring a perfectly leveled surface that promises uniform flavor distribution.
- Chocolate Topping Formation: Gently melt chocolate with coconut oil, stirring until achieving a glossy, seamless coating that will crown the mint layer with decadent elegance.
- Finishing and Setting: Delicately drizzle the molten chocolate over the mint layer, tilting the pan to guarantee complete coverage, then refrigerate for 2-3 hours until the slice achieves a firm, sliceable consistency.
- Serving Presentation: Extract the set dessert using parchment paper, slice into precise portions, and serve chilled to maximize the refreshing mint-chocolate experience.
Notes
- Choose Quality Ingredients: Select fresh, high-quality cream cheese and pure peppermint extract for the most vibrant mint flavor and smooth texture.
- Chill Thoroughly: Allow the slice to set completely in the refrigerator for at least 3 hours to ensure a firm, clean-cutting consistency that holds its shape perfectly.
- Control Mint Intensity: Adjust peppermint extract gradually, tasting as you go to achieve your preferred level of mint flavor without overwhelming the chocolate base.
- Make It Dietary-Friendly: Swap regular biscuits with gluten-free alternatives and use dairy-free cream cheese and butter for a vegan-friendly version that maintains the dessert’s rich, creamy profile.
- Prep Time: 15 minutes
- Cook Time: 2 hours
- Category: Desserts, Snacks
- Method: None
- Cuisine: Australian
Nutrition
- Serving Size: 13
- Calories: 300
- Sugar: 24 g
- Sodium: 150 mg
- Fat: 18 g
- Saturated Fat: 10 g
- Unsaturated Fat: 8 g
- Trans Fat: 0 g
- Carbohydrates: 35 g
- Fiber: 1 g
- Protein: 2 g
- Cholesterol: 30 mg